Brushless Whoop Build – Part Two

Last time I left off at having finished the soldering and successfully tested that I could connect with my radio to the flight controller and receive a video signal on my goggles, and that the video signal was right side up. I tested that the VTX protocol was configured correctly so I could use my radio to bring up the VTX settings in the OSD on my goggles and change the VTX band and channel, and that the frequency the VTX was transmitting at changed appropriately.

Everything worked as expected, so aside from the one solder bridge issue that I had to fix the first part of the build was pretty trouble free. At this point I figured that the hard parts were done as the rest of the work was just assembling the pieces onto the frame, which normally isn’t any harder than building a Lego set.

First step is to put the rubber mounting grommets on the corners of the flight controller and then mount it in the whoop frame. The grommets are hollow and fit over plastic posts that have threaded screw holes in them. I put the screw in at the rear of the flight controller as that one wouldn’t be covered by the camera mount, and it left me get the flight controller partially secured into the frame.

The next step was to get the camera snapped into its mount and then fit that over the two side and front grommets of the frame, and get all three remaining screws in and snugged down. One of the major bad habits that I’ve had to overcome with building quads is over tightening screws. Especially in instances like this where doing so flattens out the grommets and cancels out any vibration protection that they might provide for the flight controller. Or worse stripping out the plastic posts so that the screws don’t hold at all.

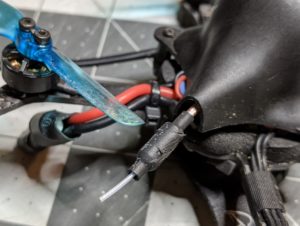
Once I got the camera mounted, it was time to get the VTX on. I’d tried a couple different options before starting the build and I thought I’d figured the best way to get the VTX and antenna mounted. I started by cutting some clear heat shrink to keep the VTX from touching the back of the camera and shorting out. It also had the added benefit of holding the antenna in place so I didn’t have to worry about trying to secure that as well. With the heat shrink on then I zip tied it upright to the back of the camera mount with the status LED and button visible.

With all of that out of the way, all that was left was the motors and props. After doing the first motor, I discovered it was easier to plug them into the flight controller before screwing them into the frame. So that’s how I did motors two through four.

Putting the props on requires some attention to detail since props come in two versions clockwise and counter-clockwise, and they have to be put on in a certain order. For my setup, I prefer what’s known as reversed props or props-out. Which means that the front right and rear left props spin clockwise, and the other two counter-clockwise. There’s some aerodynamic benefits to setting up the props this way, Oscar Liang has a good article on that.

Usually I don’t have any problems figuring which prop is which and getting them all on the correct motors, but I ran into a novel problem with the new Azi props I was using. I got one of the motors put on upside down and didn’t realize it until all four props were on. I’d never had a problem with putting a prop on upside down before. To make things worse, these were push fit and didn’t need or use screws. Which meant they were extra hard to get back off in order to fix them.

In the end because the whoop frame was pretty flexible and the props were on so tightly, I ended up having to unmount the motors so I could get a good enough grip on them to pry off the props and get everything back on right-side up and in the correct order.

The last step was to hook the quad back up to my computer and launch the BLHeli utility to make sure that all four motors were spinning the correct direction. In this instance motors two and three were backwards, but it’s an easy software change to make and write to the ESC’s. Once that was done the build was finished.

All together the new whoop weighs 24 grams and 32 grams with a 350 mAh battery, that’s just 2 grams more than my brushed Acrobee.

The last step naturally is to fly it. I charged a couple of batteries up and plugged the first one in to do the maiden flight and ran into an issue where only three of the motors spun up after the quad was armed. I tried disarming and then arming again and all four spun up but not all at once. This is odd as I’ve always had all of the motors spun up at the same time.

At first I thought I might have a power issue or some bad motors or ESC’s or something. But I found that when I connected the quad to my computer and tested the motors individually they all spun up fine. It only seemed to be a problem when I armed the quad and all four would try to start at once. I looked online but wasn’t finding any good results, not until I thought to go to BetaFPV’s site for the motors I was using. There was a link there to a support page that covered the issue I was having, which led me to looking at the startup power setting in BLHeli.

This being the first quad I’d built or used with the combination of brushless motors and 1S voltage, it had never occured to me to think about the initial amp draw that happens when the quad is armed. But it made sense once I read through the page, since the motors were fine when tested individually, and sometimes when arming I’d get a couple of motors to spin up initially and then another one or two a moment later. I ended up increasing the startup power for all four motors to 1.5 going in 0.25 increments until I could consistently get all four motors to spin up simultaneously when arming the quad.

Altogether it took me about 28 minutes to do the initial soldering, another 11 minutes to fix that solder bridge, and nearly 50 minutes to do the assembly including having to redo the motors and props and figure out the motor power issue. So the whole process was about 90 minutes, which isn’t too bad.

I’ve flown a few dozen batteries on the whoop since then and it’s quite a bit of fun to fly inside. It’s just on the edge of being too much power for indoors at least in my home which doesn’t have a lot of open space to fly. I think when I take it to the local fly-in office space it will be a lot more fun than my old brushed quad.

I also tried it outside just recently when there was some good weather and it did okay, but it’s not nearly as much fun as my toothpick is, and I only did two batteries outside out of curiosity. I think most of the time that I can fly outside it’ll be my bigger quads.

Brushless Whoop Build – Part One

It took me a while to actually sit down and do the build for the brushless whoop parts that I got for Christmas.

The first thing I like to do on a new build is test the flight controller. Especially before any soldering is done, it’s good to make sure that the flight controller works, so that later on if it doesn’t I know that it’s because of something that I did and can troubleshoot it instead of wondering if I just got a bad one from the factory. It’s easy enough to do. Plug it into a USB cable to make sure it gets power, and then make sure that Betaflight will connect to it. Test out the gyro by turning and tilting the board and make sure that the movements match up with the animated diagram in Betaflight.

At that stage, it’s not critical to do, but since it’s already connected, I like to download the latest firmware and flash it to the board. It’s just a couple of steps to do, and isn’t any harder or easier to do now or wait until later. But since it’s already connected I figure why not.

The last step I took care of before really starting the build was binding my radio. I don’t always do this part so early, usually because for anything bigger than a whoop build, I don’t use a flight controller with a built-in receiver. So there’s some soldering that normally has to take place first. But in this case since the receiver is built into the board, it’s much easier to do now where the bind button is easier to get to, than to wait and do later.

Binding the radio took me a bit to figure out since I had to find the built-in receiver specifications. I couldn’t find anything about telemetry being available or not, but it would only successfully bind when I picked the radio setting without telemetry, so I’m guessing it’s not supported. Not a big deal for a small whoop like this, but something I’ll have to keep in mind if I ever decide I need to go hunting for it outside.

With the flight controller testing out of the way, I was ready to start figuring out the build. This involves dry fitting the flight controller to the whoop frame and trying to get an idea for where the canopy, camera, and VTX were all going to sit. I found the wiring diagrams for the flight controller on BetaFPV’s site, and used those along with the printed manual that came with the VTX to figure out how everything needed to be wired together.

The only part that wasn’t immediately obvious to me until I’d studied it for a couple of minutes was that the signal wire of the camera needed to go to the camera pad on the flight controller. This would apply the OSD information, and then a wire from the VTX pad to the video in pad on the VTX would take the signal for broadcast. I also didn’t need one pair of the 5V and ground wires on the VTX since the camera already had its own.

Once I figured all of that out, then I rechecked it by fitting all of the pieces together to make sure I knew which wires to cut, which to desoldering, and what was getting soldered to what. I could always fix any mistakes, replacing or lengthening any wires that I cut too short, but I didn’t want to have to mess with that if I could avoid it with a little extra care up front.

After checking a few times though, it’s usually time to just commit and do it and hope I’ve thought through everything I needed to. In this instance that included trimming all of the VTX wires to be just a bit longer than the camera wire lengths. Trimming the plug from the camera, which I wouldn’t need, and then desoldering the two wires from the VTX that I wasn’t going to need.

Desoldering is quite easy. It just requires me to get the piece set up where I can get some pressure on the wire that I’m trying to remove, so that I can have a minimal amount of time for the soldering iron on the board. In this case the extra 5V and ground wires that were going to be replaced by the corresponding wires on the camera.

After getting the wires cut to length, I was ready to tin the wires and the pads on the VTX and flight controller. Tinning just means to prep exposed wires and any copper pads on PCB’s that I’m going to be using with solder. Ideally so that when it comes time to solder a wire to a pad, I don’t have to add any additional solder, I can simple touch them together with a bit of heat and I’m done.

Soldering a small build like this is a bit of a challenge just because of the sizes of the pads involved. I’ve found using the lowest heat setting along with a lighted magnifying glass, and a very small soldering iron tip helps tremendously for this. I’ve also applied some tricks I picked up in painting miniatures for keeping my hands steady by moving the piece to the iron and keeping my arms are my sides.

Once everything has been tinned and then soldered together, the easy part is over. With the camera, VTX, and flight controller all wired up, it’s time to check for shorts and then plugin in a battery.

Before plugging in a battery and risking releasing the magic smoke, I like to use a multimeter and check that there’s no continuity between the various connections. For example the yellow wire from the VTX to the flight controller should have continuity between the ends, but if I touch a probe to one end and then touch the other probe to the ground then I shouldn’t have any connection. If I do it means there’s a short somewhere, and on a tiny build like this it’s probably because two pads are bridged.

In my case I did have a solder bridge on the VTX between the video signal and the ground. But that’s just a matter of adding some flux to the board and using a soldering iron to try to clean up the bridge. It only took me a couple of minutes to get it cleaned up in this case, and afterwards all of the connections passed the multimeter test.

Which brings me to the last part before assembly and that was plugging in a battery and testing that everything booted up, that the VTX was broadcasting, and best of all that I was getting an image through the goggles from the camera. It’s good to do all of that before assembling everything just to make sure that there’s no more soldering fixes that need to be made, and it’s a good chance to make sure I know which way the camera needs to go so that up is up.

Like Riding a Bike

I mentioned last time that I’d finally gotten my toothpick quad fixed, but too late to actually get it in the air. Looking ahead at the weather last Monday, I wasn’t expecting to be able to fly any time soon. But I hadn’t been paying attention to the sunset times, which had been getting later now that we’re into January. While 6:15 pm isn’t normally enough time for me to fly after I get home, not like during the spring and summer, I happened to be home by 5 pm last Friday. Even better was the rain we were supposed to get didn’t happen despite a heavy overcast, and the snow on the ground was hard and patchy enough that I didn’t feel it was too risky to rip a few battery packs.

I hadn’t flown since December 27th, so it had been almost exactly 6 weeks since I’d flown last, and I was a little unsure how comfortable I’d feel getting in the air again. I shouldn’t have worried though because aside from a little adjustment just after taking off, it was like I’d just flown the day before. I think there’s so much muscle memory involved in flying that it’s actually a lot like riding a bike, just more fun.

It felt so great to be back and flying outside. Flying inside is fun, but it’s not quite the same as being outside. I hadn’t realized just how much I’d missed flying until I landed at the end of that first pack, I couldn’t get the smile off of my face.

Besides just the fun of zipping around and doing flips and loops, I’m always fascinated by the change in perspective. I was particularly struck during this session be seeing how uniform all of the roofs were in the neighborhood where they all had snow still on the north facing sides and the south facing sides which got the sun throughout the day were all clean.

I was able to get three packs in, so about 12 minutes total time in the air, before I lost the light. It’s really reminded me of what I’ve been missing out on the last few weeks while I was putting of making repairs. I’m glad I was finally able to get back out there, but I wish I hadn’t waited so long.

HX100 Repair and Modification

I’m sad to say that it’s February and I haven’t flown at all yet this year. I could have been since my brushed whoop is flyable, but I kept waiting until I got my brushless whoop built. That quad is still in pieces on my hobby table. I keep thinking I’ll get it done over the weekend, but somehow they’ve kept passing by where by the time I’m ready it’s too late on Sunday night. I thought last weekend I’d finally get time to do it but I was laid up sick all weekend. So naturally this weekend was going to be the one, but one again things came up on Saturday that kept me from getting to work on it, and then Sunday I decided I needed to get my toothpick fixed first.

We had some unseasonably warm weather in Indiana over the weekend and I was pretty upset with myself that I couldn’t take proper advantage of it because my toothpick was still out of commission from the crash back in early December.

The Patient

I’d been putting this off because I wanted to fix the issue with the flight controller and the VTX not communicating properly while I did the motor repair, but I decided that I needed to just get the motor fixed and try out the antenna modification I’d been thinking about and leave the rest until later. That way I wouldn’t miss out on any more good flying days that might come along before summer gets here and I can expect some more consistent flying conditions.

Replacing the broken motor was pretty straight forward and only took me about 15 minutes. It’s the second time I’ve had to do this so I already had a good idea of the order of operations and things I needed to look out for. Remove the canopy, take the tape off of the motor wires, and remove the four nuts holding the flight controller down. Get the motor plug loose and pull the wires out, and then take the two mounting screws out to get the motor off of the frame.

After that it’s the same steps just in reverse. Mount the new motor with the same two screws. Tape the motor wires down, fish the motor plug through the slot cut in the foam that the flight controller is mounted on, and then get the plug seated. This part probably gave me the most trouble because I was trying to do it without taking the flight controller all the way off of the frame. That would mean cutting the zip ties holding the power leads and the receiver antennas to the frame, which isn’t a big deal, but I didn’t want to do all of that unless I had to. Thankfully a little fiddling with tweezers and I was able to get the plug seated.

With that done it was just a matter of getting the flight controller fastened back down, and taking the prop off of the old broken motor shaft and putting it on the new motor. Then plugging the quad into my computer and checking the motor direction in Betaflight.

While I had the canopy off I wanted to try modifying how the VTX antenna was mounted. I mentioned back in my crash post that I needed to do something since I’d noticed that I was getting some damage to it from prop strikes. I’d already tried bending the antenna down a bit to keep it below the prop line but that didn’t seem to be helping. Also, I could have switched from the 65mm bi-blades back to the 2″ tri-blades that I was originally using but I like getting the extra flight time with the bi-blades, and besides I didn’t want to be limited in which size of prop I was using.

My idea was pretty simple. Because of the way the VTX was mounted in the canopy, I figured I could drill a hole just a bit above where the antenna currently stuck out and get an easy 30-45 degrees of uptilt on the antenna which would more than keep it out of the reach of the props. It just required doing a little dremel work and then fishing the antenna through before mounting the VTX.

This was my first time using the Dremel on plastic, and aside from a little slip which you can see above it went pretty well. I used a hobby knife and a file to clean up the hole afterwards and make sure there were no sharp edges to damage the antenna. But I’m surprised at how well this worked. It’s rare that an idea turns out exactly as expected, but I couldn’t be happier with how the antenna is coming out of the canopy now.

There should be no way the the props will hit the VTX antenna any more. I’m looking forward to getting it in the air and seeing how it flies now.

Wear and Tear

One thing I’m still not good about with flying quadcopters is checking my drones before and after I fly them. I’ve built up some excellent habits around taking care of my batteries. I don’t charge faster than 1C. I try to charge as close to when I’m going to fly as I can. I charge or discharge batteries back to their storage voltage when I’m done. But somehow I have a blind spot when it comes to the quad itself.

Case in point is the picture above, which was taken during a flying session after I’d already flown one battery. Possibly the nut was still on before I flew but it had to have been pretty loose to come off completely while I was flying. The part that really illustrates my bad habit though, is that I was putting a new battery on to fly again and only noticed the canopy was loose then I was setting it down to take off. Inspecting it then I realized that the nut on the bolt that secured the flight controller had also nearly come off as well. You can see it on the picture below just to the right of the standoff connecting the canopy to the frame.

Now likely the only really bad thing that would have happened if I had taken off with it is that the video feed would have had a lot of jitter in it with the loose canopy. Even if the nut on the flight controller bolt had come off during flight, there’s still three other bolts securing it down, and the nut itself is nylon so nothing would have shorted out or been damaged. But it’s a symptom of a bad habit of mine not to pay more attention to my equipment, and it’s a bit like driving without getting your oil changed.

I just don’t normally think about the wear and tear that’s happening while I’m flying. Once I put one together and start using it, I’m always surprised when it breaks or needs upkeep or stops working as a result just regular use. Obviously after crashing into something I would expect there to be damage, but I don’t think about what all of the vibration is doing to the fasteners on the quad while it’s in the air.

Besides this incident, I’ve also wrapped up flying before and noticed I was missing a screw from one of the motors. Which would be okay if it was because I was doing an inspection after flying, but it was just happenstance just like this instance with the canopy.

I’ve gotten a little better since then about checking the quads over before I fly, but it’s not really become an ingrained habit yet. I’ve considered making up pre- and post-flight checklists to go through, but that really feels like overkill for flying tiny little quads around. I still might at least for the short term just to help get the habit ingrained. Maybe once I have a crash or a motor drops off midair, I’ll start remembering to check things before I fly.

Flying in Public

I don’t know if I’m just lucky or if I’m basing my expectations too much off of news stories and horror stories that I’ve read online about drone pilots having problems when flying in public, but so far my experiences flying in public have all been positive.

I spent quite a lot of time flying around my yard over the summer. If found that the best spot for me to stand for the best signal was at the bottom of my driveway facing the house. This gave me the least amount of breakup flying behind my house even when going through my backyard low to the ground. Of course this also put me right out next to the street, so I was expecting to get a lot of comments and questions from neighbors but barely got any. I had one neighbor mention that it looked like fun when I first started doing it. The same one ask me a few weeks later asked if I didn’t get bored flying in the same place every day. I’d occasionally heard people commenting on it as they walked by, but always in passing, and never had anyone express concern about what I was doing.

I suppose part of the difference in expectation versus reality was what I was flying. Most drone stories you read about are for the larger photographic drones. When I was first outside was with my 30 gram whoop which was smaller than the palm of my hand. Later in the summer it was my 72 gram toothpick which was the size of my hand. Neither of which is especially loud or dangerous looking. My 3″ Acrobrat I barely flew at home, because I wasn’t comfortable flying it in such close proximity all of the houses, cars, and people around me. I’m curious if I had flown it more if anyone would have had concerns about it.

I like the to think that the main reason was how I was flying. Standing out by the road definitely made it apparent who was flying the drone, so it wasn’t like I was trying to spy on people or be sneaky at all. I also tried to always be aware of where the quad would go in the event that it had a failsafe. I didn’t fly over people’s houses or backyards, and I avoided sidewalks unless one of my kids was outside to spot for me or the time of day or weather meant there wasn’t likely going to be anyone walking by. That worked pretty well for me with one exception.

Flying low to the ground is fun as you really get a sense of how fast you’re going, plus it’s good practice for managing your throttle. Normally when I’m flying low I’ll stick to the edge of the street or yards. Because I’m moving so fast and the video resolution on my quad camera’s isn’t great, there’s a real possibility that I’ll hit something or someone before I even know they’re there. When I can though I like using the sidewalks, especially in the evenings when I can see the shadow of the quad running along the ground in front of me. I like being able to zip up the sidewalk and fly by where I’m standing. It’s just a surreal experience to pass by yourself and hear the quad zoom by even though you’re standing still.

I had no problems all summer until one day this fall when the weather wasn’t all that nice and I figured I’d be clear to use the sidewalk. I had just flown past where I was standing when I realized there was a lady walking up the street and I took off away from the sidewalk. She was still ten or fifteen feet away, but close enough to scare me. It actually wasn’t until I saw her and took off that I heard her startle. Apparently she thought I was running an RC car and wasn’t expecting it to zoom off into the air. Even with this sort of close call, she wasn’t angry or anything and kept on with her walk, but I still felt bad afterwards.

Besides yard flying I’ve been to a nearby field a few times where there’s usually people walking or riding bikes. But I’ve never had anyone express concerns there either. I’m standing out in the open and usually there flying so far up that most people don’t even see it. Ive heard a few people talking as they walk by where they’re looking around for what I’m flying, although I’ve never had anyone stop and ask. Again all of the comments when people do see it are that it looks like fun or looks cool.

I’ve also flown both my toothpick and my Acrobrat at my kids’ nearby elementary school and usually there’s no one around. A few times there’s been parents that are walking by to the playground with their kids. Typically if it’s moms they just ignore me, when it’s dad’s I usually hear a comment about how cool it looks. 

All on all, I have to say I’ve had nothing but positive experiences flying an FPV quad in public. I’m looking forward to doing more park flying this coming spring and summer than I did last year. I think as long as I continue to practice safe habits like I have been, I should be fine. 

My First Year in FPV

I had a good first year getting into the FPV hobby. This time last year I was flying my original AcroBee V2, well trying to anyway. It took me a few days to get enough of a feel for the sticks to be able to take off without slamming into the ceiling and let off the throttle without slamming into the floor. I certainly wouldn’t have guess that by now I would have multiple quads and be comfortable flying outside and doing tricks like dives and power loops.

While it started with the NewBeeDrone brushed whoop kit, I don’t think I would still be as interested in flying if I hadn’t gotten my HX100 toothpick for yard flying. Doing laps in the house and then the backyard with the whoop was fun but it started to get monotonous fairly quickly. I also started to run into issues with the aerodynamics, or lack thereof, on the ducted props when I started trying to do dives. Also just the lack of power and responsiveness of the brushed motors. Picking up the HX100 was perfect for me to really start to do more with my outside flight time, without having too much power, noise, or weight like the Acrobrat that I built.

Which brings me to the second major milestone for me for the year. For about the first six months, I was basing everything I was doing and trying to do one information I was getting from other pilots on line, mostly from YouTube or Reddit. The problem with that was most of those pilots were flying full-sized quads, not micros, and they were all flying in larger spaces than I hard access to on the average week night. That’s why I ended up building a 3″ quad to begin with because the conventional wisdom was that anything smaller than that wouldn’t really fly as well as a 5″ quad. So I went with that not realizing, that part of what that meant was the speed and power involved, neither of which I really needed for the smaller spaces I was normally flying in. So figuring that out and getting to the point where I had enough experience with flying and building quads that I could make better decisions on what I needed for my specific situation was a big accomplishment for me.

I had a lot of minor milestones just related to flying this year. Getting comfortable inside, then outside, then learning tricks. Flips, rolls, dives, and yaw spins all came pretty easily to me with some practice. I’m still working on really making them precise but I have the basics. Trying to do power loops or lookbacks though were a struggle. Anything that required me to be inverted I found very disorienting and frightening. Even just trying to chop up a flip into a pair of 180’s required overriding all of the muscle memory I’d built up. I’m better with those things now, for power loops I found it much easier to practice when I started going to nearby parks and fields where I had more space. Learning a new maneuver like that is tough in smaller spaces.

So now that Christmas has come and gone, I’m nearly back where I started. I’m looking at a similar stack of quad parts that I got for presents. I’ll be building a new whoop to fly over the next few months until spring comes and I can get back outside on a regular basis, but this time there’s soldering involved instead of just screws and plugs. I’m using brushed motors instead of brushless. I’m also not stressing about all of the configuration and tweaking that I’ll need to do.

I’m looking forward to another fun year in the FPV hobby.

Quad Troubleshooting

I actually still haven’t fixed my toothpick quad yet. Originally I wasn’t in any hurry to get it replaced and I was hoping to try that antenna fix as well, but I haven’t made the time to do it. Between the holidays and wrapping up a lot of work tasks before going on my end of the year vacation, I really didn’t have the motivation to sit down at my hobby table and take it apart even though once I did I’d probably have it all done in under an hour. But for now I wanted to talk about the most frustrating part of the hobby for me, and that’s when things just stop working or at least start having problems.

About two months months into flying my HX100 toothpick daily for about 30 minutes using six batteries, I suddenly started having an issue with my video signal going to static and then cutting out when I’d take off. Doing a visual inspection didn’t show anything. I tried taking off a few more times and then just holding the quad and moving it around by hand and noticed that any kind of vibration would cause it to go out again. It sucks when a flight session is cut short by a technical problem like this, but that’s one advantage of being able to fly at home so easily, at least I hadn’t had to drive somewhere or hike out to a remote spot only to have to leave early.

So I took the quad to my hobby table to open it up. The last time I had a problem with it the answer was pretty obvious as the receiver antenna literally fell of when I took the canopy off. Which was nice because I immediately knew what the problem was and just had to order a replacement. This time unfortunately there was no such obvious sign of what was wrong. The VTX antenna didn’t look loose at all, it was securely soldered to the board. All of the solder connections for the wires connecting the VTX to the flight controller looked solid. The wiring harness looked okay, there was some damage to it that I had noticed and fixed with electrical tape a few weeks prior when I replaced the carbon fiber frame, but there was no new damage. I tried wiggling the wires when the battery was plugged in and didn’t see any issues in my goggles from the VTX signal.

There’s another difficulty when troubleshooting problems from the bench. VTX’s general a lot of heat as in they can burn you as well as just fry themselves if left on for too long on a high power setting. This isn’t normally an issue since the expectation that they’re on a quad flying through the air so there’s a lot of cooling from air flow. When inside on a table though that’s not the case. So every time I tested it out even when I had it cranked down to 25 mW which is the lowest setting, I had a limited window if I didn’t want to ruin the VTX.

So at this point I was unsure what to do. There was nothing obviously wrong with it that I could try to fix with solder or tape. I’ve learned that this is the point where I have to start swapping components, so I ordered a replacement VTX. They’re not super expensive at $15 from online vendors like RaceDayQuads or Amazon, but still not something I wanted to be replacing often.

While I waited I decided to try to cut out the damaged sections of the wiring harness that connected the VTX to the FC and solder the wires together. Which unfortunately didn’t make any difference but it was at least some good soldering practice. It also confirmed that it wasn’t the wiring. That left either the antenna or the board which amounted to the same thing since they were soldered together.

I even ended up cutting away the heatshrink protecting the antenna and didn’t see any damage to the wire itself. So my guess at this stage was something on the board itself had gone bad. Maybe a surface mounted component was loose or some component was damaged internally.

Thankfully when the new VTX showed up in the mail a few days later, I had no problems getting the new wiring harness soldered to the flight controller and getting the quad back in good working order. Or at least I didn’t think I had any problems until I noticed that I couldn’t adjust the VTX band and channel using my radio. It wasn’t enough to keep me from flying thankfully, but it is annoying knowing that the quad wasn’t in 100% working order.

It’s actually a problem I still haven’t fixed. I even have another VTX and a replacement flight controller as well, since the issue might be on either end, and given the FC had quite a few hours of flight time on it, it’s probably that end where the issues is. It’s what happens when I know I can just fly something instead of being forced to take it apart an troubleshoot it again. I think that’s part of the reason why I’ve put off fixing the motor, since I have to take it apart enough to do that, that I might as well work on fixing the VTX issue as well.

Crashes and Quad Repair

In quad versus pole, the pole always wins.

It was decent weather over the weekend for Indiana in December, meaning that it wasn’t completely overcast, windy, and miserable. It was still cold, somewhere in the mid 30’s, but I didn’t want to pass up no wind and a little bit of sun for getting some outside flying in. I charged up half a dozen 2S batteries for my toothpick quad, and a couple of batteries for my boys’ RC cars, and we headed over to their elementary school which is only five minutes away.

I got the boys’ cars setup and they went off to do donuts and ramp off of the playground equipment, while I fired up my radio and goggles and put the first battery in.

It was a little rough getting started. I’m going to blame it on adjusting to the cold. I don’t wear gloves when I fly. I’ve tried it a couple of times and it just messes with my muscle memory too much, even with a thin pair. I had a couple of near misses with trees and playground equipment at first, but by the end of the first battery I was feeling pretty good.

Flying at the school is nice for a couple of reasons. There’s the obvious one that it’s a bigger space with a nice large parking lot so I can keep the throttle more open and really get some speed up as I fly around. There’s also a lot more stuff to play with too. There’s light poles, trees, and playground equipment to fly around and over and through. So it makes it a lot more fun to do proximity flying than what I can do when I go down to the field near my home to fly where I do more loops, flips, and rolls since there aren’t many obstacles.

The second battery started out much better than the first as I was getting familiarized with the space. I made a couple of passes through the playground. I played around with following Thing One’s RC truck as he drove around a couple of trees, and then I took off to make a big looping pass through the playground. I misjudged my line through the obstacles though and pinged of a metal pole. It was a hard hit too as it was enough to cause the flight controller to reboot. I wasn’t worried though, I’ve had hard crashes before with my HX100 and it’s rarely had a problem.

Once the FC came back up, I armed it and tried to take off, but the quad just spun a bit and wouldn’t take off. I disarmed again and took off my goggles and put my radio down to head over. I figured there was some mulch from the playground stuck in a motor or maybe on of the receiver antennas got twisted and was blocking a prop. Both of those things have happened before in a crash, which usually takes a couple of seconds to fix and then I’m back in the air again. This time it was a bit more severe.

This is actually the second time I’ve broken a motor. The last time was in October, so I’m averaging one motor every two months. The October break was some a head-on crash into a heavy tree branch that broke the front right motor. Somehow this time I broke the right rear one. I can’t tell from the video playback, but I must have yawed a little as I hit the pole. It was a pretty hard hit too. I noticed when I got home and inspected the damage that I bent the motor bell and damaged some of the magnets.

I’m not sure if it was just a hard hit against a metal pole, or if the cold had anything to do with it. I feel like I’ve had some equally hard crashes flying my yard, but those collisions usually involve tree branches or wooden fences and not heavy duty playground equipment.

So that put an early end to my flying for the day. It was cold enough out though that my boys didn’t last much longer than that anyway, so I probably wouldn’t have gotten more than another battery in anyway. Just now I have to replace the motor.

It’s not hard to do since I’m using plugs and not direct soldering the motors to the flight controller, it just requires more disassembly than I want to do. I do have to take the canopy off and take the flight controller out because of the tight space that the motor wires and plug run through. I think the last time I did it, it took me a bit more than 20 minutes to do. At least I already have the parts, since these 1103 motors come in sets of four instead of being sold individually, and they’re interchangeable so I don’t need a specific motor at each position.

To be honest, I need to take it apart and do some work on it anyway. The antenna has had a couple of prop strikes on it, and I need to either switch back to some shorter tri-blade props that can’t reach the antenna, or make a change to the canopy so that the antenna stays above the props. I have an idea to drill a small hole through the back of the canopy a few millimeters above where the antenna currently sits so I can feed the antenna out at an angle. That way the canopy itself will keep the antenna from getting down into where the props can hit it.

Finding a Lost Quad

It was the first trip to the in-law’s farm after getting my HX100, and I was looking forward to trying it out where I had lots of open space. I’d already had a good set of flights with my Acrobrat flying all of the packs I had, before switching over to my HX100 and having fun with that one.

On my last pack for the HX100, I decided to see how far it could go given the lower power VTX, and flew it out to the edge of the empty field I was using.

You can see the line of darker green between the treeline to the right and the stand of trees left of center.

I got all of the way out to the stand of trees and backed to fly along the edge of the corn field next to the empty field I’d been flying over. The video signal was having a little bit of an issue but so bad that I couldn’t fly it. Still I didn’t want to push my luck further and possibly lose it in the corn field, so I turned back towards where I was flying from.

Looking back towards where I was standing, along the edge of the green field towards the right quarter of the picture.

Only a few seconds after turning back it failsafed and crashed. The impact tilted the camera up so the top half of the view was the inside of the canopy and the rest was some plants.

Totally not realizing some of the limitations of the receiver on the HX100 versus the one on my Acrobrat, I headed out into the field with the range check on my radio turned on so I could find it by playing a little game of hot and cold. I’d done that before when crashing my Acrobrat in a different spot and it had worked great. There was a big problem with my plan though that I didn’t realize until later. The FrSky receiver that came on the HX100 quad did not support telemetry, which is important because telemetry is how the radio displays a range strength value. So I was wandering around in this field looking at a zero number that wasn’t changing, and assuming it was because I just was too far away and not that it would never not be zero even if I was right on top of the quad. It wasn’t until I got to the edge of the corn field which I knew was well past where the quad had crashed that I finally realized my mistake.

I turned of my radio at this point and instead tried studying the video feed in my goggles to see if I could tell where the quad was. There wasn’t much to go on though, unless I got very lucky and saw myself walking by.

After a couple of minutes though the video feed cut out, and the battery had been totally drained. This was the point when I first thought I might not be getting the quad back. I was standing in the middle of a large farm field with no idea how to locate a nearly brand new microquad.

At this point I had two issues to deal with. First, I was well overdue to be back at my in-law’s house for lunch after which we were supposed to be heading home. Second, I had no idea how I was going to locate the quad. This was bad as beyond just losing an expensive piece of electronics, I was sure my father-in-law wasn’t going to want to have that sitting out in his field and then getting tilled under at some point and leaching into the soil. There’s a lot of stuff used in electronics that you don’t want in a soybean or corn field.

I drove back to the house and first let my wife know I wasn’t going to be able to leave just yet. Then I grabbed my tablet and an SD Card reader so I could more easily review the DVR recorded from the quad than I could from my goggles. I was hoping something in the video would help me locate it. Lastly I drafted my sons to come out and help me search.

I drove back out to the field I’d been flying with my search party. I watched the tail end of the flight video several times and thought I knew generally where it should be, so we started to hunt around in that park of the field but had no luck after several minutes. After looking at the video again, I finally realized I was misreading the tree line in the DVR video from right before the crash. It wasn’t the stand of trees at the east end of the field, but a gap in the treeline along the south part of the field where a gas line was buried. I had been looking in the wrong place all along and taken my search party back to the same spot and continued to look in the wrong spot. My oldest had actually been asking me about that other treeline after watching the video over my shoulder. He was very excited to be right.

The actual useful frame from the DVR before the crash with the gap in the treeline.

Once we started looking in the right part of the field, we found it pretty quickly. That actually surprised me, as I figured it would take some luck to see it among the ground cover that had been planted, but the black canopy and blue props stuck out pretty well from the brown and green.

I made a lot of mistakes trying to find my quad. I should have realized that I didn’t actually have telemetry on the quad. I should have had the tablet out with me from the start in case I needed to review the DVR. I also had made a mistake the week before when configuring the quad. I had turned off the setting in Betaflight that would cause the motors to beep when the receiver loses connection to the radio. I hadn’t ever needed it before since I’d rarely lost the receiver connection and could use the radio to turn on the beeping manually if I needed help finding it in the grass. I turned it off though because it was beeping whenever I plugged in a battery while it was connected to USB in order to make a VTX change without having my radio on as well. So one of the first things I did when I got home was turn that option back on.

Failsafe Crash Clip
Full Flight