Zip Ties

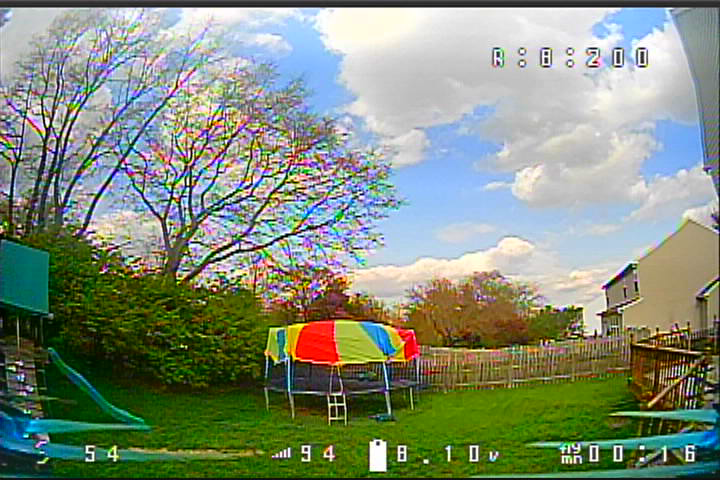
One of the things that I use the most in flying quadcopters that i didn’t anticipate is zip ties. I was flying over the weekend and towards the beginning of the session I knocked my goggles off of the tailgate of my truck and they landed on the patch antenna on the ground.

Thankfully the actual antenna was fine it was just the plastic case the broke. The plastic wouldn’t snap back in place though, so I got some zip ties out and used two to wrap around the antenna case and hold it together. At some point I should probably glue it together, but for now I like how they look with the zip tie repair.

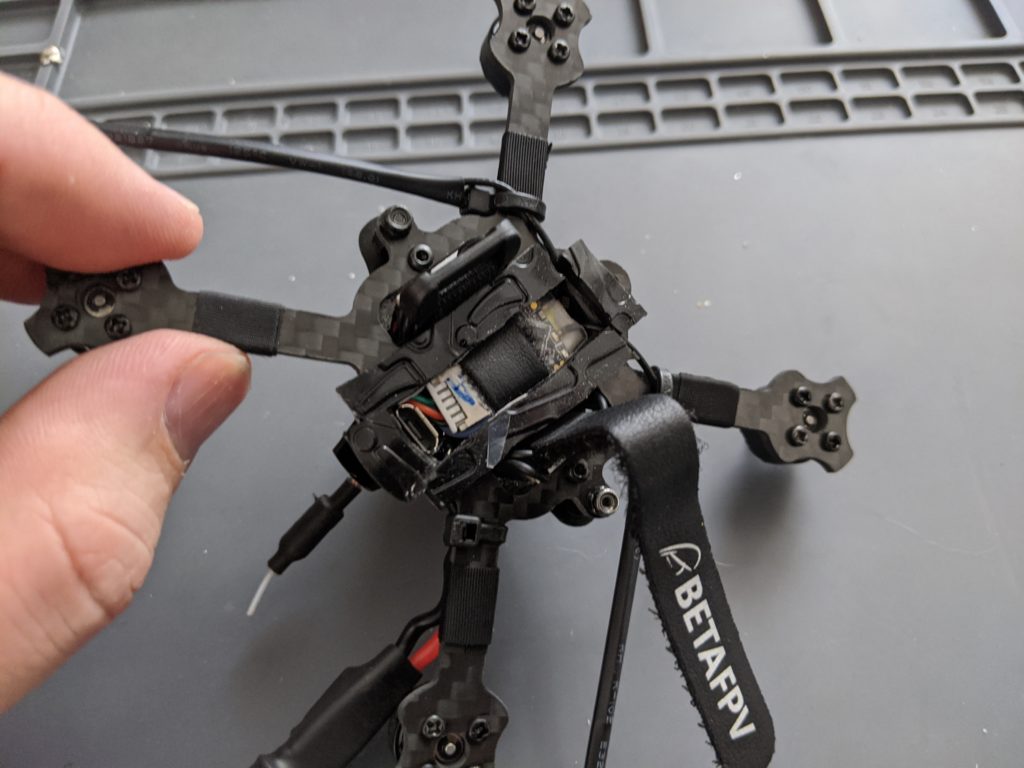
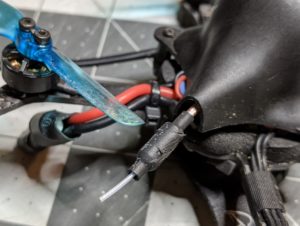
Besides making quick repairs, I’ve used zip ties in quad builds for the receiver antenna wires. They provide just enough stiffness while staying flexible especially with a heat shrink tube over it to keep the antenna in place. Plus I run the antenna under the zip tie so if they do get hit by a prop then it’s the zip tie that takes the damage and not the antenna.

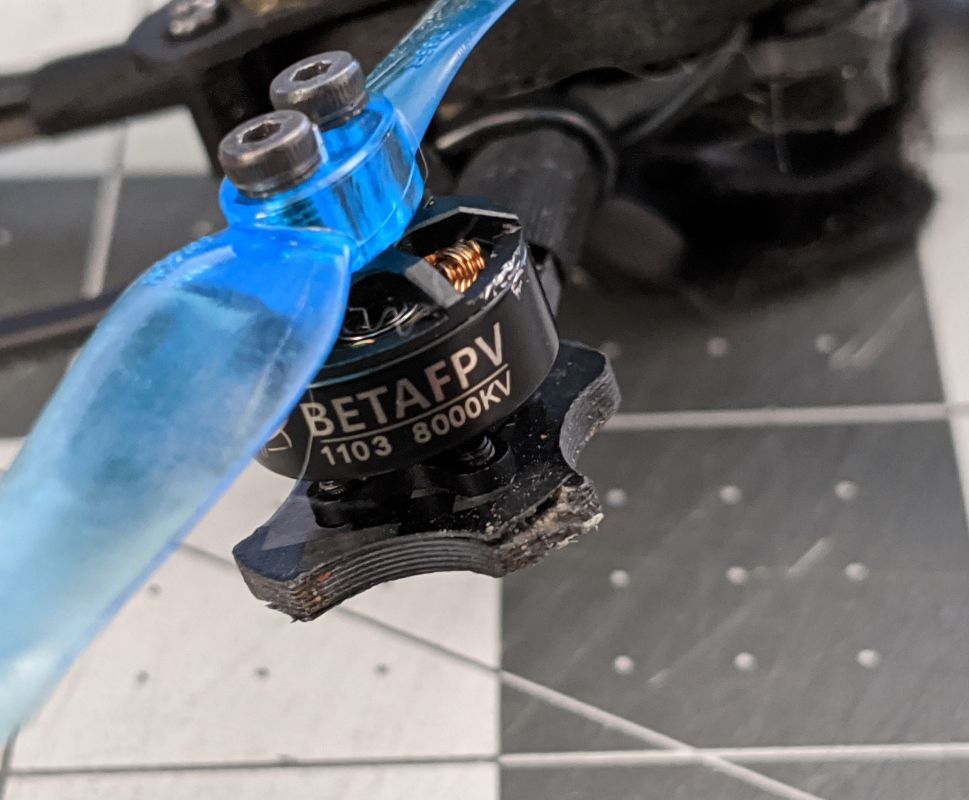
I also recently did a rebuild on my bigger 3″ Acrobrat frame where I was trying to get the VTX and receiver antennas better separated in order to see if the video signal would be cleaner. I removed the old 3D printed mount that had been holding the receiver and VTX antennas, then moved the receiver towards the front of the craft and mounted it’s antennas off of the frame with zip ties like I’ve been doing for my other builds. At first I wasn’t sure how I was going to mount the VTX on the back, the 3D printed mount had the antenna close to the body and I think it was getting blocked by the battery. I ended up using a pair of zip ties to hold it in place on one of the rear cross braces, and I’m pretty happy with how it looks and how secure it is.

Tree Bonk

Wednesday last week we had some good weather and I was able to wrap up work by 5 pm, so I charged up six batteries and headed out to the back deck to fly. I was having a pretty good session, doing a little bit of racing flying different circuits around the house and yard, doing some freestyle as well, just generally having fun and not really trying to work on anything in particular.

I started really having fun on to run my loops around the backyard that I used to do with my whoops, and found doing it with a bigger quad is pretty exhilarating. It’s a lot faster and the space feels tighter even though my toothpick quad isn’t that much bigger. I was getting pretty good too at finding different lines to follow. Trying for smoother lines each time around while mixing in a little freestyle here and there as well. It was a lot of fun.

Then I bonked the tree in the front yard. I thought it was pretty minor at first since I was just banking to do a 180 around the tree and go back the other way. It’s something I’ve done hundreds of times with no problem, except this time I pulled it up too short and hit the tree trunk. Not very hard, but I wasn’t able to recover it, so I had to do a walk of shame out front to get it. Which is when I discovered the broken prop on the front right motor, and that explained why I couldn’t recover and take off.

No big deal, I replaced the broken prop with a new one and tried to take off and finish the rest of the current battery. But when I armed it I only had three props spinning. The front left motor wasn’t working.

I disarmed the quad and spun that motor by hand, but it wouldn’t turn freely. It felt like something was catching, and I figured either the bell was bent or the magnets or stator might have gotten damaged inside. I was pretty surprised I had motor damage though, I didn’t think I’d hit that tree hard enough for that.

So that was the end of my session for the day. Later that evening I took the prop off and got the motor pulled out of the quad in preparation for replacing it. Out of curiosity I took the tiny clip off of the bottom of the motor so I could remove the bell and see what the actual damage was. That was when I discovered that there wasn’t any damage just a tiny grain of dirt or sand stuck in between two windings on the stator which must have been sticking out just enough to catch on the magnets inside the bell. I pulled that dirt out with a pair of tweezers and put the bell back on to test it and the thing spun just as smoothly as when it was new.

While it was unexpected and great that I didn’t need to replace the motor, I’d lost the clip while getting it apart. At the time I didn’t care because I wasn’t expecting to be able to put it back on the quad, but now I needed that tiny clip to keep the motor together. There was no way I was finding a tiny black piece of metal like that in my carpeted office though. Luckily I’ve been keeping all my broken parts including motors in a box, and I was able to get the clip off of one of them and use that one the motor.

This was a first for me. I normally end up just replacing parts, I’ve never been able to fix something and put it back on. Once I got the motor back on, I plugged a battery into the quad and tested the motor out and it worked great.

As a side note, the 2″ tri-blade props I’d switched to once I ran out of the 65mm bi-blades have proven to be a little too brittle. I broke too many clockwise props and didn’t have any more replacements, so I dropped back to some 1.9″ ones that I’d bought an never used. I’m going to need to order some new props though at this rate.

Here’s the full flight just to prove I don’t just crash all of the time.

Stupid Mistakes

It was a nice day and I was flying from my backyard while the kids’ were playing on their trampoline. I’d just started my fourth pack and was flying around the front of the house when my nose started to itch. What I should have done was landed to take care of it, but what I actually did was try fly one-handed and take care of it. I believe the words “real quick” passed through my mind. I ended up with me drifting into the side of the house, bouncing off, and crashing.

I knew I was in for some problems though because right after that the feed to my goggles went blue. I’ve never had that happen before. That can only be bad though.

Static usually means that the VTX is dead. A black screen with the on screen display means there’s a problem with the camera. But a blue screen was new to me, so I wasn’t sure what the problem was.

I tried unplugging the battery and plugging it back in, but got the same blue screen in my goggles. Taking off the canopy, I didn’t see any damage to the wires from the flight controller to the video transmitter or from the VTX to the camera. I tried the battery again with the canopy off and didn’t see any difference. Taking the VTX out of the canopy didn’t help either. I accidentally notice that if I squeezed the VTX between my thumb and index finger the picture would pop back in briefly. So I started looking more closely at the board and finally figured out the problem.

The red arrow is pointing to a tiny brown and silver rectangle. That’s a capacitor. Here’s a closer photo.

Another one with tweezers included for scale.

So the crash had knocked that capacitor partly loose. Whatever it’s purpose it was allowing the VTX to transmit enough that my goggles were picking up a signal but not actually sending any OSD or the camera image. It was also far, far too small for me to try to resolder. I did try to put some liquid tape over the area, thinking that might hold it in place, but it was so small that just putting that on the board moved the capacitor.

I’ve really had a hard time with this A01 VTX. More so than anything else that came on the HX100 originally. But I’m not sure I can blame this one anything other the me being stupid and having to bad luck to crash into a landscaping timber. Regardless of the cause though I was ready to try something else.

I’d never been a fan of the soldered on antenna connection for one, especially since it came with a dipole antenna and I used left-hand circular polarized antennas on my goggles and my whoops. So this was a change to upgrade the VTX antenna as well as the VTX itself.

I’d been pretty happy with the Eachine Nano that I’d used in my brushless whoop build, and had bought a second one as a spare, so I decided to use that as a replacement. The trick was figuring out how I was going to mount it in the quad since it’s rectangular shaped and wouldn’t mount in the canopy in the same way. I also didn’t want to try to stick it to the flight controller with double-sided tape. After a bit of fiddling around trying to decide how to mount it I had the idea to strip all of the components off of the old A01 VTX board, mount it in the canopy, and then stick the new VTX to it.

I had to rewire things a bit since the new VTX didn’t have a camera passthrough on it like the original one. So I could run the 5V and ground from the VTX to the camera, but had to splice in a new wire from the camera to the flight controller (the yellow to blue signal wire below).

Once the new wiring was figured out, I just had to solder everything back onto the flight controller, which by this point is pretty routine for me. Plugged in a battery to test that I could see a picture in my goggles and that I was able to change the VTX band, channel, and power from the OSD. Then I put heat shrink on the VTX to both isolate it electrically from the old VTX I was going to mount it to and also to hold the antenna on. This board uses a UF.L connector which is very light but isn’t the most secure, so I like to have the heat shrink on it to help make sure it doesn’t go anywhere.

That did require an update to my canopy mod though, since the new antenna wouldn’t fit through the old hole that I’d drilled. So I clipped the end just a bit to allow the antenna to slip through. I debated drilling a hole through the end that I could zip-tie shut, but so far it’s seemed pretty secure without it.

So now I have a further modified HX100. I think at this point maybe one or two motors, the canopy, and the camera are the only original parts. Most of the problems I’ve had with it have been due to crashes and my own stupid mistakes. It’s definitely been my favorite quadcopter to fly.

Still Flying

Despite having a couple of projects in mind, I haven’t been doing much over the last two weeks except flying. With everyone stuck at home, I’ve just been sticking to my yard which is kind of limiting, but after being stuck flying whoops indoors for the winter having decent weather now to get outside regularly is a treat even if I can’t get to a bigger field or go over to the nearby elementary school’s parking lot.

I started practicing proximity flying a lot more, which just means flying close to objects and trying to hit smaller gaps. I have a loop in my backyard that I like to do with whoops that I started trying with my toothpick and while I’ve been getting better at it, I have had a couple of collisions. My favorite so far was then I was trying to skim our fence line and caught a board. I couldn’t manage this again if I tried.

While that collision didn’t do any damage, I whacked the bird feeder that we keep hanging from my kids’ playset that ended up breaking a motor. I’m honestly surprised about how much damage it did compared to some of the other collisions and crashed. It might be that was one of the older motors on the quad, since I don’t keep track of which was which when I’ve done rebuilds but that’s probably something I should be better about doing. It might have just been the speed I was going. Regardless, I broke the bell again and had to swap the motor out.

I recorded myself doing the motor repair and experimented to making a timelapse of it that I posted online. Normally I use YouTube for anything longer than what will fit on Twitter or Instagram as a clip, like this one of the 30 seconds before the crash.

But I hadn’t realized I could post videos of 10 minutes or less to Instagram’s TV service and it would show up in my regular feed. While I always try to post things to both Twitter and Instagram, I’ve noticed that on Twitter I normally get feedback from my friends and on Instagram I get more feedback from other FPV pilots. Which was why I was excited by the IGTV find because I can post YouTube links on Twitter but not on Instagram. So I was able to put the timelapse motor repair on both YouTube/Twitter and IGTV and it was interesting to see how different the audiences were on both platforms.

Approaching Twitter and Instagram from the point of view of a content creator has been very new to me. I’ve always used both platforms to just share things and interact with friends that I already have, but as I’ve been doing more quadcopter stuff I’ve been trying to use hashtags and things to try and reach a broader audience.

Besides getting a bit better at Instagram, I’ve done a couple of experiments with Twitch streaming. I did two rough test streams and then a longer one where I did about 10 batteries and posted online when I went live. I had a receiver that I could connect to my tablet via an USB cable and then capture and stream the quadcopter camera feed using a Streamlabs app. That all worked better than I expected from a technical standpoint. It even looks like I could add the front facing camera on the table to show me wearing the goggles when I’m flying, but I haven’t tried that yet. I’m not sure about Twitch as a platform for sharing FPV flying though, as I can’t interact with chat while I’m flying. I can try to catch up on messages in between batteries though, which would mean about 3-5 minutes of flying followed by chatting for a couple of minutes and then flying again.

It’s an interesting idea and something I’m going to try again soon, along with doing more videos for Instagram and YouTube.

Fly Hard, Break Stuff

The longer I fly quads, the more comfortable I get, and the more risks I start to take. As a result I end up crashing a fair bit, not as often as when I first started, but these crashes involve more speed and end up causing a lot more wear and tear on my quad. For example, here’s photos from 3/14 and 3/23 just over a week apart.

The props are so shiny and smooth with clean edges in the one on the left, whereas the one on the right has been crashed a few times and the props have whacked tree branches, pavement, and the gutter along the edge of my garage. The frame has taken some serious frontal hits and started to split a bit on the end of one of the arms. You can also see a scratch on the motor bell too.

I’ve found that I’m taking a fair bit of pride in how used it looks after about a week of flying. It means I’m pushing myself trying to get better. Taking risks. Crashing doesn’t scare me at this stage since I’m getting enough experience with repairs that I don’t think there’s anything I couldn’t replace in it. In fact, thinking about it now, I think there’s probably two motors that are original, plus the canopy, and the camera. Everything else the frame, the flight controller, the video transmitter, and the receiver are all upgraded or replacements.

All that said, I’ve been grounded the last few days because of the weather. We had a couple of days of rain, and I thought I was going to be able to fly on Sunday but I hadn’t realized that we were in for 30 MPH winds. That’s too much for me to handle for yard flying when I might catch a gust at the wrong time and hit my house or worse the neighbor’s. I was almost able to sneak in some time on Thursday last week but it literally started raining as I walked outside to set up, so I had to turn around and go back inside. Rather than just discharge all my batteries and give up through I used them to charge up a set of 1S batteries and flew my whoop inside. It’s not quite the same but it’s still fun.

Repairs Revisited

The replacement flight controller came in so I could follow up on the repairs from last time, where I realized I had two bad ESC’s after finishing the rebuild. When flashing my new replacement for the replacement flight controller, I noticed that there were two firmware targets that were very similar: MATEKF411 and MATEKF411RX. I had picked the RX version thinking that was for FC’s with built-in receivers. I’m not sure that’s what the RX means in this case as there’s also an SE target. It doesn’t matter anyway since these FC’s don’t have built-in receivers, I was confusing it with the flight controller that I had recently used on my whoop build.

So for the new flight controller I smartly used the correct firmware, the MATEKF411 version, and the new board tested out fine both in Betaflight and BLHeli. All the ESC’s were recognized and I even plugged in motors and made sure they all spun up. Then I had the thought that maybe the problem with my other FC was because of the wrong firmware. So I plugged that in and flashed the same firmware on that, and checked in BLHeli and all four ESCs were recognized. The board and ESCs were fine all along, I just had the wrong firmware loaded so the resource mapping was incorrect. I’m honestly surprised that it worked at all but I’m guessing that the major difference between the two models is the pin assignments on the main chip. I’m glad I didn’t brick it or burn anything out.

I honestly wasn’t expecting to prove out my comment from last week so soon, but there really is always something new to learn in this hobby.

Now I had two working flight controllers. One was all soldered up and just needed to be remounted on the carbon fiber frame, I even had some extra foam to use since I’d torn off the foam padding that was originally stuck on figuring I wouldn’t need it. The other FC was better designed for a toothpick style frame with it’s sideways mounted USB and motor plugs, but it would have to be soldered to the receiver and video transmitter. So I had to decide on which way to go. While I really liked the design on the new board, I decided to use the other one since it was already soldered and just needed to be mounted. I’d save the new flight controller for when I busted the current one or decided to build a new quadcopter.

I remounted the flight controller and other electronics on the frame, and got the quad rebuilt in time for a little test flight one evening when there was decent weather. The first battery went well. For the second one I bumped the video transmitter power up from 25mW to 200mW, which gives me a better picture when I have obstacles between me and the quad. After making that change the video started to go to snow and then cut out whenever I would throttle up. I was not happy. I’d only got one flight in before a new problem had popped up.

So the next two nights I spent a lot of time troubleshooting the problem. I checked solder joints. I looked for damage to wires and electronics. I tried with the canopy off so the VTX was hanging loose from the flight controller, and noticed that it worked better that way, so I tried a different set of screws and standoffs to have the canopy sit higher off of the flight controller but that didn’t work either. I tried replacing the wires on the VTX harness. I tried direct soldering the wires from the flight controller to the video transmitter. Nothing worked and eventually I’d run out of ideas to try. The problem seemed to be getting worse too as it was a now having issues when the VTX was loose, and started to cut out completely until I restarted it. So I gave up and swapped out the video transmitter for a new one. I’d bought two the last time I needed to replace it, so I already had a spare.

After getting the new video transmitter installed everything worked perfectly. I’m not sure what caused the last one to fail. Possibly I messed up something when soldering, either the board got too hot or I bumped something. I don’t think so, since I normally notice those things. It might just have been cumulative damaged from crashes and just vibration form flying that finally stopped it from working. There’s no way for me to know, and it’s one of the hardest things for me to deal with in this hobby, not being able to determine exactly what happened and why.

We had cold but sunny weather on Sunday, so I was able to get get out and fly my yard for a full six packs before my fingers got too cold. I didn’t have any more trouble with the quad. Finally.

I’ve been very happy so far with the all of the flight controllers, canopy, motors, and frames that I’ve bought from BetaFPV but I think I’m done with their A01 VTX’s. I’m on my third one for a quad that I’ve had for about seven months, and it seem like they should last longer than that. So I’m looking at some other manufacturers for alternatives to switch to when this one dies. Or maybe I’ll find that a couple of months is just about as long as these last. Or I’ll get a surprise and this one will end up lasting for a year.

Repairs and Frustrations

Sunday was a great day for flying, especially for March. It was sunny, there wasn’t much winder, and it hit the mid 60’s. Very rate for this time of year. So when I got up in the morning I made it a priority to get my toothpick repaired, as it was still sitting in pieces from the prior weekend’s crash at the local elementary school.

I’m starting to thing that place is cursed for me, as only a couple of months ago I whacked a pole and broke a motor. On my second battery I caught a branch and crashed to the pavement, which snapped on of the zip ties that I use to mount my receiver antennas, and I found later when I opened it up also knocked the smartaudio wire off of the flight controller.

So I sat down at my hobby table and got set up to do some soldering. I had decided in addition to just fixing the wire and the antenna I was going to finally get around to troubleshooting why my smartaudio wasn’t working.

Smartaudio is a protocol that allows the flight controller to change the band, channel, and power on the VTX. For some transmitters this is a nice bonus and saves a pilot from having to read tiny LEDs and do a bunch of button presses to switch settings. For my VTX thought it’s the only way to change the settings, since it doesn’t have a button and the LEDs only show what the power level is. Up until now I’d just been setting the goggles to the band and channel the VTX got stuck on, but if I ever wanted to go somewhere with other pilots I wouldn’t be able to fly like that. I also wanted to be able to increase the transmitter power, since the VTX would go up to 200mW and provide a much clearer picture when going around obstacles.

I resoldered the wire and tested out the smartaudio but it still didn’t work, which I expected. I’d previously checked the wire and the solder joints, so I didn’t really think resoldering the wire again would fix things, but I wanted to check regardless. The next step was to swap the VTX. I’d been putting this off because I didn’t want to have to move the camera over to the other VTX that I had since it would require desoldering and then soldering three wires. Not that I’d mind doing that, but I’d rather not when I don’t know if the VTX is really the issue. I had gotten a VTX and camera combo though for a possible replacement part for my brushless whoop, if and when it was needed, and it used the same plug and pin-out that my toothpick VTX did. So I was easily able to plug in the new VTX and camera and see if the smartaudio worked there. It didn’t, which was good as it meant I knew the problem was in the flight controller, but bad since that meant I’d have to swap in a new flight controller. Which basically meant a rebuild.

As I was taking the quad apart so I could pull the flight controller out, I found a crack in the front of the frame. I’m not sure if it was from that last crash or not, but it turns out that there was a silver lining for having to swap the flight controller. I probably wouldn’t have noticed that crack otherwise, since I tend to focus on the arms and motor mounts when looking for damage.

Just the foam that the flight controller was mounted to was holding the front together. I found the start of a crack at the rear mounting screw as well, and there was enough stress on the frame when I pulled the mounting foam off that the frame split in half.

Once I had everything disassembled, I soldered up the new flight controller to my receiver and my VTX and tested out the smartaudio again and found it working. So it was some kind of problem with the original flight controller. Not too surprising I suppose given the amount of abuse it’s taken over the last six months or so.

At this stage I was pretty pleased with myself, I’d finally resolve and issue that had been bugging me for months. I got out a new frame and started rebuilding my quad again. I took this as an opportunity to adjust one other thing that had been bothering me.

When I originally upgraded the receiver, I put it on top of the flight controller. Originally it was underneath and I didn’t like that since I was worried about the battery impacting it in a crash, so I put it on top. The problem with that is the canopy is a pretty tight space and it was tough to get the wires for the VTX and the receiver along with the VTX and receiver themselves all tucked in under the canopy without crimping any wires. So this time around I fixed the flight controller mount so there would be a bit more space underneath and moved the receiver back there. I also added more battery padds around the area thinking that would help protect the receiver and the USB port.

My last step in the build was to hook the quad back up to the computer and check the motor directions. I didn’t keep track of which motor was in which position when I took them off of the old frame, so I figured some of them would be backwards and I’d need to change some setting in BLHeli.

I plugged in the quad and when into Betaflight to the motors tab and tried to spin up the first motor, only to have nothing happen. Motor two spun up but it was in the wrong position, I was setting the motor two throttle in Betaflight but it was the motor in position three that was spinning. Motor three spun up but was in the motor four position, and motor four didn’t spin at all. So basically the right-side motors weren’t spinning and the left-side motors were, but they were mapped to the wrong motor positions. Remapping motors isn’t hard, it’s just a couple of commands that need to be entered in Betaflight’s command line interface tab:

resource MOTOR 1 B07
resource MOTOR 2 B06
resource MOTOR 3 B05
resource MOTOR 4 B04 

The problem was I had two motors not spinning up at all. I switched over to the BLHeli configuration tool and it would only read two of the ESCs, 2 and 3 of course.

So now I’m stuck. I’ve no idea if I did something to the flight controller when I was soldering or mounting it to the new frame, or if I just got a bad one with two dead ESCs on it. I’m guessing they were just bad as all of that circuitry is on the bottom of the board and I did all of my soldering on top. But either way it meant I wasn’t able to go out and fly. I mean I could have rebuilt it again with the old flight controller but then my smartaudio issue would be back, and that would be undoing a lot of work.

In the end I went online and ordered a new flight controller. I took the opportunity to get one that was more designed for toothpick frames, it has the USB and motor plugs side mounted instead of sticking straight down. That should make them harder to damage, and will be easier to maintain.

I’ve made a point in my whoop build log and this one that you should test out your flight controller right out of the package, and I guess I need to add another step to that. For these flight controllers with the battery leads already soldered on and motor plugs, it’s just as easy to add motors and plug in a battery and test that all of the ESCs work as well.

I love this hobby. Flying is a mixture of exhilaration and relaxation for me. Soldering electronics and building a quad is very satisfying. There’s always something new to learn in this hobby though, and it can be very frustrating to put a couple of hours into troubleshooting a build only to be stuck with an unflyable quad while waiting on new parts.

HX100 Repair and Modification

I’m sad to say that it’s February and I haven’t flown at all yet this year. I could have been since my brushed whoop is flyable, but I kept waiting until I got my brushless whoop built. That quad is still in pieces on my hobby table. I keep thinking I’ll get it done over the weekend, but somehow they’ve kept passing by where by the time I’m ready it’s too late on Sunday night. I thought last weekend I’d finally get time to do it but I was laid up sick all weekend. So naturally this weekend was going to be the one, but one again things came up on Saturday that kept me from getting to work on it, and then Sunday I decided I needed to get my toothpick fixed first.

We had some unseasonably warm weather in Indiana over the weekend and I was pretty upset with myself that I couldn’t take proper advantage of it because my toothpick was still out of commission from the crash back in early December.

The Patient

I’d been putting this off because I wanted to fix the issue with the flight controller and the VTX not communicating properly while I did the motor repair, but I decided that I needed to just get the motor fixed and try out the antenna modification I’d been thinking about and leave the rest until later. That way I wouldn’t miss out on any more good flying days that might come along before summer gets here and I can expect some more consistent flying conditions.

Replacing the broken motor was pretty straight forward and only took me about 15 minutes. It’s the second time I’ve had to do this so I already had a good idea of the order of operations and things I needed to look out for. Remove the canopy, take the tape off of the motor wires, and remove the four nuts holding the flight controller down. Get the motor plug loose and pull the wires out, and then take the two mounting screws out to get the motor off of the frame.

After that it’s the same steps just in reverse. Mount the new motor with the same two screws. Tape the motor wires down, fish the motor plug through the slot cut in the foam that the flight controller is mounted on, and then get the plug seated. This part probably gave me the most trouble because I was trying to do it without taking the flight controller all the way off of the frame. That would mean cutting the zip ties holding the power leads and the receiver antennas to the frame, which isn’t a big deal, but I didn’t want to do all of that unless I had to. Thankfully a little fiddling with tweezers and I was able to get the plug seated.

With that done it was just a matter of getting the flight controller fastened back down, and taking the prop off of the old broken motor shaft and putting it on the new motor. Then plugging the quad into my computer and checking the motor direction in Betaflight.

While I had the canopy off I wanted to try modifying how the VTX antenna was mounted. I mentioned back in my crash post that I needed to do something since I’d noticed that I was getting some damage to it from prop strikes. I’d already tried bending the antenna down a bit to keep it below the prop line but that didn’t seem to be helping. Also, I could have switched from the 65mm bi-blades back to the 2″ tri-blades that I was originally using but I like getting the extra flight time with the bi-blades, and besides I didn’t want to be limited in which size of prop I was using.

My idea was pretty simple. Because of the way the VTX was mounted in the canopy, I figured I could drill a hole just a bit above where the antenna currently stuck out and get an easy 30-45 degrees of uptilt on the antenna which would more than keep it out of the reach of the props. It just required doing a little dremel work and then fishing the antenna through before mounting the VTX.

This was my first time using the Dremel on plastic, and aside from a little slip which you can see above it went pretty well. I used a hobby knife and a file to clean up the hole afterwards and make sure there were no sharp edges to damage the antenna. But I’m surprised at how well this worked. It’s rare that an idea turns out exactly as expected, but I couldn’t be happier with how the antenna is coming out of the canopy now.

There should be no way the the props will hit the VTX antenna any more. I’m looking forward to getting it in the air and seeing how it flies now.

Quad Troubleshooting

I actually still haven’t fixed my toothpick quad yet. Originally I wasn’t in any hurry to get it replaced and I was hoping to try that antenna fix as well, but I haven’t made the time to do it. Between the holidays and wrapping up a lot of work tasks before going on my end of the year vacation, I really didn’t have the motivation to sit down at my hobby table and take it apart even though once I did I’d probably have it all done in under an hour. But for now I wanted to talk about the most frustrating part of the hobby for me, and that’s when things just stop working or at least start having problems.

About two months months into flying my HX100 toothpick daily for about 30 minutes using six batteries, I suddenly started having an issue with my video signal going to static and then cutting out when I’d take off. Doing a visual inspection didn’t show anything. I tried taking off a few more times and then just holding the quad and moving it around by hand and noticed that any kind of vibration would cause it to go out again. It sucks when a flight session is cut short by a technical problem like this, but that’s one advantage of being able to fly at home so easily, at least I hadn’t had to drive somewhere or hike out to a remote spot only to have to leave early.

So I took the quad to my hobby table to open it up. The last time I had a problem with it the answer was pretty obvious as the receiver antenna literally fell of when I took the canopy off. Which was nice because I immediately knew what the problem was and just had to order a replacement. This time unfortunately there was no such obvious sign of what was wrong. The VTX antenna didn’t look loose at all, it was securely soldered to the board. All of the solder connections for the wires connecting the VTX to the flight controller looked solid. The wiring harness looked okay, there was some damage to it that I had noticed and fixed with electrical tape a few weeks prior when I replaced the carbon fiber frame, but there was no new damage. I tried wiggling the wires when the battery was plugged in and didn’t see any issues in my goggles from the VTX signal.

There’s another difficulty when troubleshooting problems from the bench. VTX’s general a lot of heat as in they can burn you as well as just fry themselves if left on for too long on a high power setting. This isn’t normally an issue since the expectation that they’re on a quad flying through the air so there’s a lot of cooling from air flow. When inside on a table though that’s not the case. So every time I tested it out even when I had it cranked down to 25 mW which is the lowest setting, I had a limited window if I didn’t want to ruin the VTX.

So at this point I was unsure what to do. There was nothing obviously wrong with it that I could try to fix with solder or tape. I’ve learned that this is the point where I have to start swapping components, so I ordered a replacement VTX. They’re not super expensive at $15 from online vendors like RaceDayQuads or Amazon, but still not something I wanted to be replacing often.

While I waited I decided to try to cut out the damaged sections of the wiring harness that connected the VTX to the FC and solder the wires together. Which unfortunately didn’t make any difference but it was at least some good soldering practice. It also confirmed that it wasn’t the wiring. That left either the antenna or the board which amounted to the same thing since they were soldered together.

I even ended up cutting away the heatshrink protecting the antenna and didn’t see any damage to the wire itself. So my guess at this stage was something on the board itself had gone bad. Maybe a surface mounted component was loose or some component was damaged internally.

Thankfully when the new VTX showed up in the mail a few days later, I had no problems getting the new wiring harness soldered to the flight controller and getting the quad back in good working order. Or at least I didn’t think I had any problems until I noticed that I couldn’t adjust the VTX band and channel using my radio. It wasn’t enough to keep me from flying thankfully, but it is annoying knowing that the quad wasn’t in 100% working order.

It’s actually a problem I still haven’t fixed. I even have another VTX and a replacement flight controller as well, since the issue might be on either end, and given the FC had quite a few hours of flight time on it, it’s probably that end where the issues is. It’s what happens when I know I can just fly something instead of being forced to take it apart an troubleshoot it again. I think that’s part of the reason why I’ve put off fixing the motor, since I have to take it apart enough to do that, that I might as well work on fixing the VTX issue as well.

Crashes and Quad Repair

In quad versus pole, the pole always wins.

It was decent weather over the weekend for Indiana in December, meaning that it wasn’t completely overcast, windy, and miserable. It was still cold, somewhere in the mid 30’s, but I didn’t want to pass up no wind and a little bit of sun for getting some outside flying in. I charged up half a dozen 2S batteries for my toothpick quad, and a couple of batteries for my boys’ RC cars, and we headed over to their elementary school which is only five minutes away.

I got the boys’ cars setup and they went off to do donuts and ramp off of the playground equipment, while I fired up my radio and goggles and put the first battery in.

It was a little rough getting started. I’m going to blame it on adjusting to the cold. I don’t wear gloves when I fly. I’ve tried it a couple of times and it just messes with my muscle memory too much, even with a thin pair. I had a couple of near misses with trees and playground equipment at first, but by the end of the first battery I was feeling pretty good.

Flying at the school is nice for a couple of reasons. There’s the obvious one that it’s a bigger space with a nice large parking lot so I can keep the throttle more open and really get some speed up as I fly around. There’s also a lot more stuff to play with too. There’s light poles, trees, and playground equipment to fly around and over and through. So it makes it a lot more fun to do proximity flying than what I can do when I go down to the field near my home to fly where I do more loops, flips, and rolls since there aren’t many obstacles.

The second battery started out much better than the first as I was getting familiarized with the space. I made a couple of passes through the playground. I played around with following Thing One’s RC truck as he drove around a couple of trees, and then I took off to make a big looping pass through the playground. I misjudged my line through the obstacles though and pinged of a metal pole. It was a hard hit too as it was enough to cause the flight controller to reboot. I wasn’t worried though, I’ve had hard crashes before with my HX100 and it’s rarely had a problem.

Once the FC came back up, I armed it and tried to take off, but the quad just spun a bit and wouldn’t take off. I disarmed again and took off my goggles and put my radio down to head over. I figured there was some mulch from the playground stuck in a motor or maybe on of the receiver antennas got twisted and was blocking a prop. Both of those things have happened before in a crash, which usually takes a couple of seconds to fix and then I’m back in the air again. This time it was a bit more severe.

This is actually the second time I’ve broken a motor. The last time was in October, so I’m averaging one motor every two months. The October break was some a head-on crash into a heavy tree branch that broke the front right motor. Somehow this time I broke the right rear one. I can’t tell from the video playback, but I must have yawed a little as I hit the pole. It was a pretty hard hit too. I noticed when I got home and inspected the damage that I bent the motor bell and damaged some of the magnets.

I’m not sure if it was just a hard hit against a metal pole, or if the cold had anything to do with it. I feel like I’ve had some equally hard crashes flying my yard, but those collisions usually involve tree branches or wooden fences and not heavy duty playground equipment.

So that put an early end to my flying for the day. It was cold enough out though that my boys didn’t last much longer than that anyway, so I probably wouldn’t have gotten more than another battery in anyway. Just now I have to replace the motor.

It’s not hard to do since I’m using plugs and not direct soldering the motors to the flight controller, it just requires more disassembly than I want to do. I do have to take the canopy off and take the flight controller out because of the tight space that the motor wires and plug run through. I think the last time I did it, it took me a bit more than 20 minutes to do. At least I already have the parts, since these 1103 motors come in sets of four instead of being sold individually, and they’re interchangeable so I don’t need a specific motor at each position.

To be honest, I need to take it apart and do some work on it anyway. The antenna has had a couple of prop strikes on it, and I need to either switch back to some shorter tri-blade props that can’t reach the antenna, or make a change to the canopy so that the antenna stays above the props. I have an idea to drill a small hole through the back of the canopy a few millimeters above where the antenna currently sits so I can feed the antenna out at an angle. That way the canopy itself will keep the antenna from getting down into where the props can hit it.