After watching NewBeeDrone’s build tutorial video about a dozen times leading up to Christmas, I figured I was covered for putting it together. The kit was pretty easy with no soldering, just a few screws and plugs. It turned out to be a bit harder than I expected though, because of the tiny tiny tiny screws.
I thought I was set for tools, since all I needed was a #000 Phillips screwdriver, but my set wasn’t magnetized which I didn’t realize was something I would want until it was too late. Getting these tiny screws in with only two hands difficult to do. Later on when I looked into getting some magnetized screwdrivers, I found that websites and packaging at hardware stores are very bad about say whether or not they’re magnetized. Which was frustrating until I happened across a magnetizer at Home Depot for $4 and now my existing screwdrivers are fine.
After assembling the Acrobee, I needed to bind it. The kit uses a BeeBrain V2 (now replace by the BeeBrain Lite), which is an all-in-one flight controller, ESC, and receiver. Binding is the process of pairing the receiver on the quad with the transmitter in my radio. Getting the radio into bind mode is easy, just go into the menu on the Taranis and set bind mode. For the receiver though, it involved pressing a tiny button about the size of the screws I’d already struggled with while plugging in a battery at the same time. I eventually discovered a trick for this. I used USB instead of a battery since the BeeBrain powered the receiver off of USB, and it was easier to plug USB into the quad, press the bind button using a screw driver, and then plugging in the USB to the computer one handed.
Once the quad and my radio were talking to one another, I had to get the quad plugged into my computer so I could get it flashed to the latest firmware and configured. This is where Betaflight comes in.

Betaflight is the firmware that runs on the flight controller (FC). The flight controller is the hardware that converts the inputs transmitted from the radio into commands to the electronic speed controllers (ESCs) for the four motors. So when I tell the quad to roll right, the FC determines which motors need to speed up and which need to slow down. It also handles the on-screen display (OSD) which shows things like battery voltage and received signal strength indicator (RSSI) in the FPV goggles.
Of course I couldn’t just plug the quad into the computer USB and have it recognized right away. I need to find some drivers online but that didn’t work either, which is when I went online and found a Bardwell video that walked me through fixing my problem. Just a quick aside, Joshua Bardwell’s YouTube channel and his FPV Know-It-All site have been great for getting into flying FPV quads. Especially for learning Betaflight and troubleshooting issues. Once I finally had Betaflight installed and able to connect to my new Acrobee, the rest of the configuration wasn’t to far off from the NewBeeDrone Betaflight setup video that I’d already watched a few times.
All told, it took me until late in the afternoon on Christmas Day but I eventually got everything put together, configured, and was ready to fly. I was feeling pretty confident. I practiced a bit in a simulator called Liftoff and figured I’d be able to take off and hover no problem. Just the same as with the toy quad I’d started out with.
Maybe it was because the simulator I’d practiced in had me flying outdoors and was simulating a larger quad with 5″ propeller, instead of nano-sized quad with 30mm props, or maybe it’s just a simulator vs real world thing, but I struggled a lot for the first couple of hours to even take off an hover let along zip around the house like I’d imagined.
When I’d give it enough throttle to take off, it would shoot up, and then I’d back of and it would plummet to the floor. I tried a lot of different things that day in adjusting the configuration in Betaflight and doing a lot more research, but I’m not really sure that did much to improve things. I think it just came down to getting enough practice in. Eventually I had enough stick time in that by that evening I was able to get around the house.
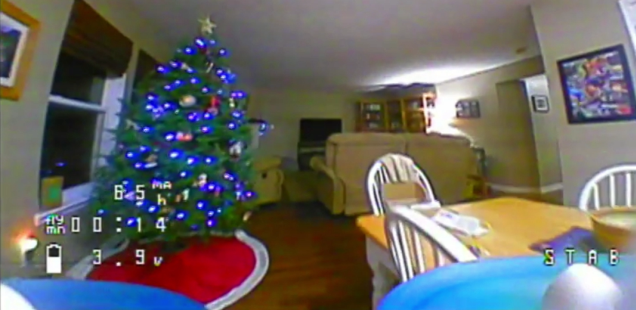
Watching that video to put together for this post was a little painful for me. I see so many mistakes now that I didn’t realize at the time. The virtual current meter which is displaying the milliamp hours (mAh) used is totally wrong, and I’ve since gotten used to knowing when to land based on the voltage instead. Flying the battery down to 3.2 volts instead of 3.5 which hurts the lifespan of the battery. Using angle mode (the STAB on the OSD) instead of acro or rate mode. For whoop racers angle mode is actually pretty common, but as someone who was planning to get into larger quads once Sprint came around and do more freestyle flying, it’s a good way to get into some bad habits. Angle mode will level the quad once a stick is released, and doesn’t allow for doing tricks like flips and rolls.
Beyond the software stuff, I really notice now how little planning I’m doing. There’s no line that I’m following as I go around the house, which exacerbates my roughness on the controls and issues with keeping altitude on a turn.
I’ve since realized that I went about this all the hard way, but I really didn’t have much choice given the timing. Starting out indoors is much more difficult than learning to fly outside because there’s more space to make corrections. But given I was learning to fly in the dead of winter when there was quite a bit of snow on the ground, I didn’t have a lot of other options, and I certainly didn’t want to wait for better weather.


