Wear and Tear

One thing I’m still not good about with flying quadcopters is checking my drones before and after I fly them. I’ve built up some excellent habits around taking care of my batteries. I don’t charge faster than 1C. I try to charge as close to when I’m going to fly as I can. I charge or discharge batteries back to their storage voltage when I’m done. But somehow I have a blind spot when it comes to the quad itself.

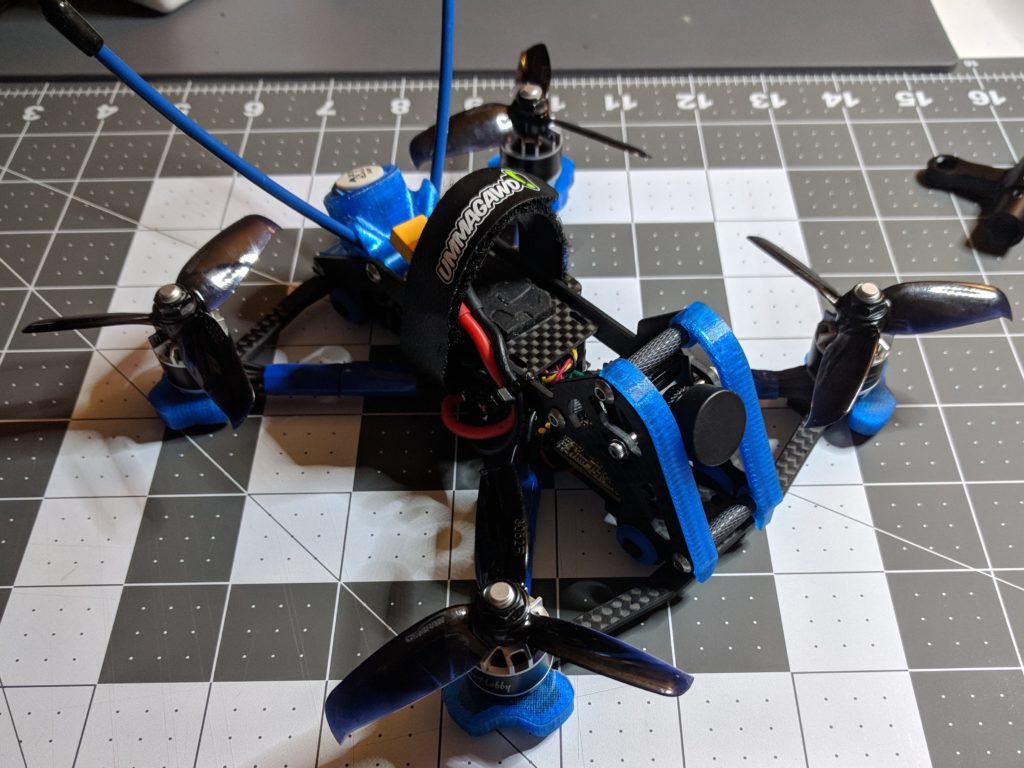
Case in point is the picture above, which was taken during a flying session after I’d already flown one battery. Possibly the nut was still on before I flew but it had to have been pretty loose to come off completely while I was flying. The part that really illustrates my bad habit though, is that I was putting a new battery on to fly again and only noticed the canopy was loose then I was setting it down to take off. Inspecting it then I realized that the nut on the bolt that secured the flight controller had also nearly come off as well. You can see it on the picture below just to the right of the standoff connecting the canopy to the frame.

Now likely the only really bad thing that would have happened if I had taken off with it is that the video feed would have had a lot of jitter in it with the loose canopy. Even if the nut on the flight controller bolt had come off during flight, there’s still three other bolts securing it down, and the nut itself is nylon so nothing would have shorted out or been damaged. But it’s a symptom of a bad habit of mine not to pay more attention to my equipment, and it’s a bit like driving without getting your oil changed.

I just don’t normally think about the wear and tear that’s happening while I’m flying. Once I put one together and start using it, I’m always surprised when it breaks or needs upkeep or stops working as a result just regular use. Obviously after crashing into something I would expect there to be damage, but I don’t think about what all of the vibration is doing to the fasteners on the quad while it’s in the air.

Besides this incident, I’ve also wrapped up flying before and noticed I was missing a screw from one of the motors. Which would be okay if it was because I was doing an inspection after flying, but it was just happenstance just like this instance with the canopy.

I’ve gotten a little better since then about checking the quads over before I fly, but it’s not really become an ingrained habit yet. I’ve considered making up pre- and post-flight checklists to go through, but that really feels like overkill for flying tiny little quads around. I still might at least for the short term just to help get the habit ingrained. Maybe once I have a crash or a motor drops off midair, I’ll start remembering to check things before I fly.

Flying in Public

I don’t know if I’m just lucky or if I’m basing my expectations too much off of news stories and horror stories that I’ve read online about drone pilots having problems when flying in public, but so far my experiences flying in public have all been positive.

I spent quite a lot of time flying around my yard over the summer. If found that the best spot for me to stand for the best signal was at the bottom of my driveway facing the house. This gave me the least amount of breakup flying behind my house even when going through my backyard low to the ground. Of course this also put me right out next to the street, so I was expecting to get a lot of comments and questions from neighbors but barely got any. I had one neighbor mention that it looked like fun when I first started doing it. The same one ask me a few weeks later asked if I didn’t get bored flying in the same place every day. I’d occasionally heard people commenting on it as they walked by, but always in passing, and never had anyone express concern about what I was doing.

I suppose part of the difference in expectation versus reality was what I was flying. Most drone stories you read about are for the larger photographic drones. When I was first outside was with my 30 gram whoop which was smaller than the palm of my hand. Later in the summer it was my 72 gram toothpick which was the size of my hand. Neither of which is especially loud or dangerous looking. My 3″ Acrobrat I barely flew at home, because I wasn’t comfortable flying it in such close proximity all of the houses, cars, and people around me. I’m curious if I had flown it more if anyone would have had concerns about it.

I like the to think that the main reason was how I was flying. Standing out by the road definitely made it apparent who was flying the drone, so it wasn’t like I was trying to spy on people or be sneaky at all. I also tried to always be aware of where the quad would go in the event that it had a failsafe. I didn’t fly over people’s houses or backyards, and I avoided sidewalks unless one of my kids was outside to spot for me or the time of day or weather meant there wasn’t likely going to be anyone walking by. That worked pretty well for me with one exception.

Flying low to the ground is fun as you really get a sense of how fast you’re going, plus it’s good practice for managing your throttle. Normally when I’m flying low I’ll stick to the edge of the street or yards. Because I’m moving so fast and the video resolution on my quad camera’s isn’t great, there’s a real possibility that I’ll hit something or someone before I even know they’re there. When I can though I like using the sidewalks, especially in the evenings when I can see the shadow of the quad running along the ground in front of me. I like being able to zip up the sidewalk and fly by where I’m standing. It’s just a surreal experience to pass by yourself and hear the quad zoom by even though you’re standing still.

I had no problems all summer until one day this fall when the weather wasn’t all that nice and I figured I’d be clear to use the sidewalk. I had just flown past where I was standing when I realized there was a lady walking up the street and I took off away from the sidewalk. She was still ten or fifteen feet away, but close enough to scare me. It actually wasn’t until I saw her and took off that I heard her startle. Apparently she thought I was running an RC car and wasn’t expecting it to zoom off into the air. Even with this sort of close call, she wasn’t angry or anything and kept on with her walk, but I still felt bad afterwards.

Besides yard flying I’ve been to a nearby field a few times where there’s usually people walking or riding bikes. But I’ve never had anyone express concerns there either. I’m standing out in the open and usually there flying so far up that most people don’t even see it. Ive heard a few people talking as they walk by where they’re looking around for what I’m flying, although I’ve never had anyone stop and ask. Again all of the comments when people do see it are that it looks like fun or looks cool.

I’ve also flown both my toothpick and my Acrobrat at my kids’ nearby elementary school and usually there’s no one around. A few times there’s been parents that are walking by to the playground with their kids. Typically if it’s moms they just ignore me, when it’s dad’s I usually hear a comment about how cool it looks. 

All on all, I have to say I’ve had nothing but positive experiences flying an FPV quad in public. I’m looking forward to doing more park flying this coming spring and summer than I did last year. I think as long as I continue to practice safe habits like I have been, I should be fine. 

My First Year in FPV

I had a good first year getting into the FPV hobby. This time last year I was flying my original AcroBee V2, well trying to anyway. It took me a few days to get enough of a feel for the sticks to be able to take off without slamming into the ceiling and let off the throttle without slamming into the floor. I certainly wouldn’t have guess that by now I would have multiple quads and be comfortable flying outside and doing tricks like dives and power loops.

While it started with the NewBeeDrone brushed whoop kit, I don’t think I would still be as interested in flying if I hadn’t gotten my HX100 toothpick for yard flying. Doing laps in the house and then the backyard with the whoop was fun but it started to get monotonous fairly quickly. I also started to run into issues with the aerodynamics, or lack thereof, on the ducted props when I started trying to do dives. Also just the lack of power and responsiveness of the brushed motors. Picking up the HX100 was perfect for me to really start to do more with my outside flight time, without having too much power, noise, or weight like the Acrobrat that I built.

Which brings me to the second major milestone for me for the year. For about the first six months, I was basing everything I was doing and trying to do one information I was getting from other pilots on line, mostly from YouTube or Reddit. The problem with that was most of those pilots were flying full-sized quads, not micros, and they were all flying in larger spaces than I hard access to on the average week night. That’s why I ended up building a 3″ quad to begin with because the conventional wisdom was that anything smaller than that wouldn’t really fly as well as a 5″ quad. So I went with that not realizing, that part of what that meant was the speed and power involved, neither of which I really needed for the smaller spaces I was normally flying in. So figuring that out and getting to the point where I had enough experience with flying and building quads that I could make better decisions on what I needed for my specific situation was a big accomplishment for me.

I had a lot of minor milestones just related to flying this year. Getting comfortable inside, then outside, then learning tricks. Flips, rolls, dives, and yaw spins all came pretty easily to me with some practice. I’m still working on really making them precise but I have the basics. Trying to do power loops or lookbacks though were a struggle. Anything that required me to be inverted I found very disorienting and frightening. Even just trying to chop up a flip into a pair of 180’s required overriding all of the muscle memory I’d built up. I’m better with those things now, for power loops I found it much easier to practice when I started going to nearby parks and fields where I had more space. Learning a new maneuver like that is tough in smaller spaces.

So now that Christmas has come and gone, I’m nearly back where I started. I’m looking at a similar stack of quad parts that I got for presents. I’ll be building a new whoop to fly over the next few months until spring comes and I can get back outside on a regular basis, but this time there’s soldering involved instead of just screws and plugs. I’m using brushed motors instead of brushless. I’m also not stressing about all of the configuration and tweaking that I’ll need to do.

I’m looking forward to another fun year in the FPV hobby.

Quad Troubleshooting

I actually still haven’t fixed my toothpick quad yet. Originally I wasn’t in any hurry to get it replaced and I was hoping to try that antenna fix as well, but I haven’t made the time to do it. Between the holidays and wrapping up a lot of work tasks before going on my end of the year vacation, I really didn’t have the motivation to sit down at my hobby table and take it apart even though once I did I’d probably have it all done in under an hour. But for now I wanted to talk about the most frustrating part of the hobby for me, and that’s when things just stop working or at least start having problems.

About two months months into flying my HX100 toothpick daily for about 30 minutes using six batteries, I suddenly started having an issue with my video signal going to static and then cutting out when I’d take off. Doing a visual inspection didn’t show anything. I tried taking off a few more times and then just holding the quad and moving it around by hand and noticed that any kind of vibration would cause it to go out again. It sucks when a flight session is cut short by a technical problem like this, but that’s one advantage of being able to fly at home so easily, at least I hadn’t had to drive somewhere or hike out to a remote spot only to have to leave early.

So I took the quad to my hobby table to open it up. The last time I had a problem with it the answer was pretty obvious as the receiver antenna literally fell of when I took the canopy off. Which was nice because I immediately knew what the problem was and just had to order a replacement. This time unfortunately there was no such obvious sign of what was wrong. The VTX antenna didn’t look loose at all, it was securely soldered to the board. All of the solder connections for the wires connecting the VTX to the flight controller looked solid. The wiring harness looked okay, there was some damage to it that I had noticed and fixed with electrical tape a few weeks prior when I replaced the carbon fiber frame, but there was no new damage. I tried wiggling the wires when the battery was plugged in and didn’t see any issues in my goggles from the VTX signal.

There’s another difficulty when troubleshooting problems from the bench. VTX’s general a lot of heat as in they can burn you as well as just fry themselves if left on for too long on a high power setting. This isn’t normally an issue since the expectation that they’re on a quad flying through the air so there’s a lot of cooling from air flow. When inside on a table though that’s not the case. So every time I tested it out even when I had it cranked down to 25 mW which is the lowest setting, I had a limited window if I didn’t want to ruin the VTX.

So at this point I was unsure what to do. There was nothing obviously wrong with it that I could try to fix with solder or tape. I’ve learned that this is the point where I have to start swapping components, so I ordered a replacement VTX. They’re not super expensive at $15 from online vendors like RaceDayQuads or Amazon, but still not something I wanted to be replacing often.

While I waited I decided to try to cut out the damaged sections of the wiring harness that connected the VTX to the FC and solder the wires together. Which unfortunately didn’t make any difference but it was at least some good soldering practice. It also confirmed that it wasn’t the wiring. That left either the antenna or the board which amounted to the same thing since they were soldered together.

I even ended up cutting away the heatshrink protecting the antenna and didn’t see any damage to the wire itself. So my guess at this stage was something on the board itself had gone bad. Maybe a surface mounted component was loose or some component was damaged internally.

Thankfully when the new VTX showed up in the mail a few days later, I had no problems getting the new wiring harness soldered to the flight controller and getting the quad back in good working order. Or at least I didn’t think I had any problems until I noticed that I couldn’t adjust the VTX band and channel using my radio. It wasn’t enough to keep me from flying thankfully, but it is annoying knowing that the quad wasn’t in 100% working order.

It’s actually a problem I still haven’t fixed. I even have another VTX and a replacement flight controller as well, since the issue might be on either end, and given the FC had quite a few hours of flight time on it, it’s probably that end where the issues is. It’s what happens when I know I can just fly something instead of being forced to take it apart an troubleshoot it again. I think that’s part of the reason why I’ve put off fixing the motor, since I have to take it apart enough to do that, that I might as well work on fixing the VTX issue as well.

Crashes and Quad Repair

In quad versus pole, the pole always wins.

It was decent weather over the weekend for Indiana in December, meaning that it wasn’t completely overcast, windy, and miserable. It was still cold, somewhere in the mid 30’s, but I didn’t want to pass up no wind and a little bit of sun for getting some outside flying in. I charged up half a dozen 2S batteries for my toothpick quad, and a couple of batteries for my boys’ RC cars, and we headed over to their elementary school which is only five minutes away.

I got the boys’ cars setup and they went off to do donuts and ramp off of the playground equipment, while I fired up my radio and goggles and put the first battery in.

It was a little rough getting started. I’m going to blame it on adjusting to the cold. I don’t wear gloves when I fly. I’ve tried it a couple of times and it just messes with my muscle memory too much, even with a thin pair. I had a couple of near misses with trees and playground equipment at first, but by the end of the first battery I was feeling pretty good.

Flying at the school is nice for a couple of reasons. There’s the obvious one that it’s a bigger space with a nice large parking lot so I can keep the throttle more open and really get some speed up as I fly around. There’s also a lot more stuff to play with too. There’s light poles, trees, and playground equipment to fly around and over and through. So it makes it a lot more fun to do proximity flying than what I can do when I go down to the field near my home to fly where I do more loops, flips, and rolls since there aren’t many obstacles.

The second battery started out much better than the first as I was getting familiarized with the space. I made a couple of passes through the playground. I played around with following Thing One’s RC truck as he drove around a couple of trees, and then I took off to make a big looping pass through the playground. I misjudged my line through the obstacles though and pinged of a metal pole. It was a hard hit too as it was enough to cause the flight controller to reboot. I wasn’t worried though, I’ve had hard crashes before with my HX100 and it’s rarely had a problem.

Once the FC came back up, I armed it and tried to take off, but the quad just spun a bit and wouldn’t take off. I disarmed again and took off my goggles and put my radio down to head over. I figured there was some mulch from the playground stuck in a motor or maybe on of the receiver antennas got twisted and was blocking a prop. Both of those things have happened before in a crash, which usually takes a couple of seconds to fix and then I’m back in the air again. This time it was a bit more severe.

This is actually the second time I’ve broken a motor. The last time was in October, so I’m averaging one motor every two months. The October break was some a head-on crash into a heavy tree branch that broke the front right motor. Somehow this time I broke the right rear one. I can’t tell from the video playback, but I must have yawed a little as I hit the pole. It was a pretty hard hit too. I noticed when I got home and inspected the damage that I bent the motor bell and damaged some of the magnets.

I’m not sure if it was just a hard hit against a metal pole, or if the cold had anything to do with it. I feel like I’ve had some equally hard crashes flying my yard, but those collisions usually involve tree branches or wooden fences and not heavy duty playground equipment.

So that put an early end to my flying for the day. It was cold enough out though that my boys didn’t last much longer than that anyway, so I probably wouldn’t have gotten more than another battery in anyway. Just now I have to replace the motor.

It’s not hard to do since I’m using plugs and not direct soldering the motors to the flight controller, it just requires more disassembly than I want to do. I do have to take the canopy off and take the flight controller out because of the tight space that the motor wires and plug run through. I think the last time I did it, it took me a bit more than 20 minutes to do. At least I already have the parts, since these 1103 motors come in sets of four instead of being sold individually, and they’re interchangeable so I don’t need a specific motor at each position.

To be honest, I need to take it apart and do some work on it anyway. The antenna has had a couple of prop strikes on it, and I need to either switch back to some shorter tri-blade props that can’t reach the antenna, or make a change to the canopy so that the antenna stays above the props. I have an idea to drill a small hole through the back of the canopy a few millimeters above where the antenna currently sits so I can feed the antenna out at an angle. That way the canopy itself will keep the antenna from getting down into where the props can hit it.

Finding a Lost Quad

It was the first trip to the in-law’s farm after getting my HX100, and I was looking forward to trying it out where I had lots of open space. I’d already had a good set of flights with my Acrobrat flying all of the packs I had, before switching over to my HX100 and having fun with that one.

On my last pack for the HX100, I decided to see how far it could go given the lower power VTX, and flew it out to the edge of the empty field I was using.

You can see the line of darker green between the treeline to the right and the stand of trees left of center.

I got all of the way out to the stand of trees and backed to fly along the edge of the corn field next to the empty field I’d been flying over. The video signal was having a little bit of an issue but so bad that I couldn’t fly it. Still I didn’t want to push my luck further and possibly lose it in the corn field, so I turned back towards where I was flying from.

Looking back towards where I was standing, along the edge of the green field towards the right quarter of the picture.

Only a few seconds after turning back it failsafed and crashed. The impact tilted the camera up so the top half of the view was the inside of the canopy and the rest was some plants.

Totally not realizing some of the limitations of the receiver on the HX100 versus the one on my Acrobrat, I headed out into the field with the range check on my radio turned on so I could find it by playing a little game of hot and cold. I’d done that before when crashing my Acrobrat in a different spot and it had worked great. There was a big problem with my plan though that I didn’t realize until later. The FrSky receiver that came on the HX100 quad did not support telemetry, which is important because telemetry is how the radio displays a range strength value. So I was wandering around in this field looking at a zero number that wasn’t changing, and assuming it was because I just was too far away and not that it would never not be zero even if I was right on top of the quad. It wasn’t until I got to the edge of the corn field which I knew was well past where the quad had crashed that I finally realized my mistake.

I turned of my radio at this point and instead tried studying the video feed in my goggles to see if I could tell where the quad was. There wasn’t much to go on though, unless I got very lucky and saw myself walking by.

After a couple of minutes though the video feed cut out, and the battery had been totally drained. This was the point when I first thought I might not be getting the quad back. I was standing in the middle of a large farm field with no idea how to locate a nearly brand new microquad.

At this point I had two issues to deal with. First, I was well overdue to be back at my in-law’s house for lunch after which we were supposed to be heading home. Second, I had no idea how I was going to locate the quad. This was bad as beyond just losing an expensive piece of electronics, I was sure my father-in-law wasn’t going to want to have that sitting out in his field and then getting tilled under at some point and leaching into the soil. There’s a lot of stuff used in electronics that you don’t want in a soybean or corn field.

I drove back to the house and first let my wife know I wasn’t going to be able to leave just yet. Then I grabbed my tablet and an SD Card reader so I could more easily review the DVR recorded from the quad than I could from my goggles. I was hoping something in the video would help me locate it. Lastly I drafted my sons to come out and help me search.

I drove back out to the field I’d been flying with my search party. I watched the tail end of the flight video several times and thought I knew generally where it should be, so we started to hunt around in that park of the field but had no luck after several minutes. After looking at the video again, I finally realized I was misreading the tree line in the DVR video from right before the crash. It wasn’t the stand of trees at the east end of the field, but a gap in the treeline along the south part of the field where a gas line was buried. I had been looking in the wrong place all along and taken my search party back to the same spot and continued to look in the wrong spot. My oldest had actually been asking me about that other treeline after watching the video over my shoulder. He was very excited to be right.

The actual useful frame from the DVR before the crash with the gap in the treeline.

Once we started looking in the right part of the field, we found it pretty quickly. That actually surprised me, as I figured it would take some luck to see it among the ground cover that had been planted, but the black canopy and blue props stuck out pretty well from the brown and green.

I made a lot of mistakes trying to find my quad. I should have realized that I didn’t actually have telemetry on the quad. I should have had the tablet out with me from the start in case I needed to review the DVR. I also had made a mistake the week before when configuring the quad. I had turned off the setting in Betaflight that would cause the motors to beep when the receiver loses connection to the radio. I hadn’t ever needed it before since I’d rarely lost the receiver connection and could use the radio to turn on the beeping manually if I needed help finding it in the grass. I turned it off though because it was beeping whenever I plugged in a battery while it was connected to USB in order to make a VTX change without having my radio on as well. So one of the first things I did when I got home was turn that option back on.

Failsafe Crash Clip
Full Flight

Not a Yard Flyer

At this stage in my FPV journey it’s May and I’ve finally gotten my 3″ build back together on a new frame with all of the broken components replaced. Now the primary reason why I went for a build with 3″ props was because I’d heard that anything smaller than that didn’t really fly as well as a regular 5″ quad, but I didn’t really have the perspective at the time to understand what that meant for what I was actually looking for.

My yard is about two tenths of an acre, or just over 800 square meters, in size, and while not tiny it turns out is too small to fly a 3″ build in. Or at least too small for someone who’s just stepped up from flying whoops with brushed motors to a much larger quad with brushless motors. To illustrate what I mean, my AcroBee whoop weighs 30 grams with a battery, and my Acrobrat clocks in at 260 grams with battery, which is about half a pound. I can’t quantify the difference in speed involved between the two but it was very significant. So just like I started out the hard way by learning to fly indoors, I misjudged the amount of quad I needed for yard flying as well.

I tried addressing this by adding a throttle cut in my transmitter. This is a way of reducing the throttle by a percentage so that giving the maximum throttle on the stick would only have the quad go at say 90% of it’s real maximum. I gave 75% a shot first, then 60% and then 50% before I started to feel more comfortable. Even then, with the louder motors and the heavier weight, I just wasn’t comfortable flying the yard when my kids were out playing or there were neighbors outside. Hitting someone with a whoop won’t normally hurt given the light weight and prop guards, but hitting someone with a half pound inertia and 3″ spinning plastic blades would cause some damage.

Fortunately my kids’ elementary school is nearby and the grounds are open on the weekend. So I as able to make a few trips over there to fly the parking lot when it was empty. But that was just enough of a taste of getting to fly a bigger and faster quad, that it made flying the whoops around the yard on weeknights not as fun. So I started researching again to see about some of the smaller options for 2.5″ and 2″ quads to see what there was that would work better for me to be able to fly in the evenings after work where I wouldn’t have to drive anywhere.

This summer a new class of micro quadcopter known as a Toothpick designed by YouTuber KababFPV became very popular (he’s a dentist which is where the name came from). These were small quads with very light, usually about 70 grams, carbon fiber frames with 2″ or 2.5″ props. As this type of build started to take off, it seemed like it fit what I was looking for pretty well, but I struggled to find a good frame I liked and figure out what motors and other parts I needed.

Then in late August Is saw a review for BetaFPV’s HX100 and thought maybe that was worth giving a shot. It’s not a perfect build. I don’t like the way the VTX antenna in the back comes out even with the props, but the weight and size looked good so I thought I’d try it out.

Flying a toothpick-style quad in my yard was a completely different experience from my Acrobrat right from the start. It’s about 72 grams with a 500 mAh 2S battery, so about twice as heavy as a whoop instead of 8 times as heavy. It would still hurt if I hit someone with it but I don’t think it would cause any injuries, and hopefully I never have occasion to find out. With 2″ props on it and 1103 motors, it’s not nearly as loud either, so I don’t worry about flying it when my kids are out playing or there’s a lot of traffic in the neighborhood.

So the HX100 has been the perfect yard flyer for me. From August on I started keeping half a dozen 2S batteries charged so I could go outside after dinner and get in about half and hour of flying around the house whenever the weather permitted.

In hindsight it makes sense that what I was looking for in a yard flyer isn’t really what most people were talking about online when they were talking about smaller quads. I think I was just a few months ahead of the curve as the whole microclass of quads personified by the toothpick design has really exploded in the last few months. I just didn’t know then what kinds of questions I should be asking and I didn’t have any frame of reference to evaluate the information I was finding. Which is part of the fun of the hobby for me, it’s a constant learning experience.

Building a Quad – Frame Change

After my first real flights ended with a broken battery lead and a fried flight controller and messed up video transmitter, I decided that since I was going to have to take everything apart anyway, I might as well change the frame I was using. While I liked the Phreak it really wasn’t suited well to having a four high stack, and rather than getting taller standoffs and screws to raise the top plate I decided to switch to an Acrobrat.

An Acrobrat is a 3″ frame designed with three mounting positions and a top-mounted battery, where the Phreak only had one mounting position and a bottom-mounted battery. That meant I could separate out the boards in the flight stack and have the camera and HD board up front, the flight controller and ESC in the middle, and the VTX and receiver in the back. Having the battery on top also meant I wouldn’t be landing on it.

Since I was moving to a new frame, I also got a new set of 3d printed accessories from Brain3d. They had a nice kit that included arm guards, front bumpers, and a nice rear mount to handle both the VTX and receiver antennas.

Of course switching the frames meant taking everything off of the original and moving it over to the new one. But more than that, I had to lengthen the motor wires since the Acrobrat’s layout had a wider length from where the motors mounted to the ESC on the center stack. Fortunately I had saved all of the wire I’d originally trimmed, so it wasn’t too difficult to solder and heat shrink extensions on and retrim and solder back onto the ESC. I also decided to add a capacitor to the build to help smooth out any electrical noise, and taped it down to one of the arms.

With that done I was back to the original repairs I would have needed anyway. I soldered the wiring harnesses back up to the new flight controller board and reseated it on top of the ESC. Then I got the camera and VTX both hooked back up and mounted. The receiver I ended up loosely zip tying to the VTX, which I’m not sure was a good idea even with the Kapton tape to keep them electrically isolated but I haven’t tried changing that around yet.

While it didn’t take me as long as the original build it was still a few hours worth of work to move all of the electronics over to the new frame. I have to say that it was worth it though. It was much easier to fit everything in the Acrobrat than it was the Phreak, which just wasn’t designed to have that extra board in it for HD capture from the FPV camera.

Battery leads securely zip tied to the side-plate of the frame.

It took me a while to get to this point, but I’m pretty happy with the second iteration of my 3″ quad build. I have to put a 60% throttle cut on it in order to fly it around my yard, but that power is nice to have when I go to my in-laws farm or take it to a nearby park.

Building a Quad – First Flights and a Mistake

Can you spot the problem?

Having finished building my first quadcopter, I took it outside for a hover test and maiden flight.

For the hover test, I basically treated it like a live grenade. Setting the quad up on the driveway, gingerly plugging in the battery, and then sprinting away. Which is comical looking back on it now, but at the time I really had no idea what to expect. Before then I had already done motor tests without the props on, but something about having three inch spinning plastic blades had me erring on the side of caution. I armed the quad and throttled up until the quad lifted off of the ground and then I held it there for a few seconds before setting it back down. It didn’t flip out or anything, so it was time to actually fly it.

With my goggles on, I rearmed the quad and took it for a short maiden flight around my front yard. It was exhilarating but terrifying as well. At the time I just assumed it was because I was going from a small quad with brushed motors to a bigger one with brushless motors, and that I would get used to it after a period of adjustment. Regardless the maiden flight was good, although I didn’t really get a chance to push the motors much. I had wrapped up my build late and was pushing sunset as it was. I didn’t think it would be smart to take risks with a brand new quad especially when I wasn’t comfortable yet with the new size and additional power.

That weekend, we had a trip up to my in-laws farm for the weekend, which excited me since I’d have the chance to fly someplace where I wouldn’t have to worry about space or people or traffic. Although I did realize shortly after take off that I hadn’t paid attention to where the overhead power lines were, so I had to land and take my goggles off briefly to look around and map out what areas I wanted to stay away from. I had six batteries charged that I was looking forward to using.

The first flight went pretty well, and I was enjoying really getting to go full throttle with it. I was still pretty terrified of crashing it before I’d really gotten a chance to enjoy it much, so I was playing it safe and not trying out any rolls or flips or dives. But it was still a lot of fun to race over the fields and along the fences.

The second flight was great too. I was starting to relax a bit more, although not enough to start trying any tricks. It was really enough of a learning experience to adjust to the bigger weight and different type of motors, than to worry about doing any fancy flying.

Sadly there wasn’t a third flight.

I don’t know if it was the way I unplugged the battery after the second flight, or if it was a bad solder joint that was weakened by the vibrations during flight. But the red wire on the battery lead had come loose from positive battery pad and I didn’t realize it until I plugged the third battery in and I heard a popping noise. At first I didn’t realize what had happened so I unplugged the battery and plugged it back in again. Which is when I noticed that the red wire was loose from the pad, and quickly yanked the batter again.

I hadn’t release any magic smoke, and there was no visible damage to any of the electronics. I figured the electronics were fine and I would only needed to resolder the lead back onto the pad in order to have the quad working again. Of course it turned out to be a bit more of a struggle than that.

Once I got home, I resoldered the wire and plugged in the quad, but nothing happened. I then tried plugging it into USB and still couldn’t get any life from the flight controller. Despite there being no visible damage to the flight controller there was a short in the board somewhere. It turned out that while the ESC board was fine both the flight controller and the VTX were shot and had to be replaced. It was a $60 reminder about something I’d forgotten to do when building the quad, zip tie my battery leads.

In all of the buld videos I’ve seen the person doing the build always zip ties the leads to the frame after getting them soldered. This is incase the battery gets ejected in a crash that it won’t rip the pads right off the the board. Or in my case so that the joint isn’t getting pulled on. Even if it had been a bad solder join, had I zip tied the wires in place then it wouldn’t been moving around and possibly not even ruined any of the electronics.

Going back and looking at pictures from the original build, I actually think the ground wire joint looks worse than the positive does. The other thing I should have done better here was solder the wires at an angle so they were coming out along an arm without any sharp bending.

Building a Quad – Assembly

After picking the parts the first thing I did was take the flight controller and plug it into USB and connect it to Betaflight to check two things. First just to make sure that it powered up before I started doing any soldering on it. So in case I got a defective part I would be sure that it wasn’t something I did on the workbench that broke it, and I’d more easily be able to get a replacement. The second thing was to see if it was to record the firmware target that the flight controller was using and make sure it was the most recent firmware version.

Then next thing to do to prepare for the build was to flash the receiver with the most recent firmware version from FrSky. This was a new process to me and involved downloading the firmware from the vendor, storing it on an SD card that I inserted into my radio, and then plugging the receiver into the radio using a wiring harness that the receiver came, then flashing the firmware.

Finally it was time to start building the quad, starting with the frame. I’d already watched a video of a more experience builder putting one together, but seeing it done once and doing it yourself tend to be very different experiences. For fun and to try to stay organized, I started out by organizing all of the pieces.

There’s four arms, blue standoffs, a top plate, a pair of bottom plates that sandwich the arms, and miscellaneous screws. Putting it together wasn’t too much different from assembling a Lego kit or any of the various children’s toys that I’ve had to put together after a birthday party or on Christmas morning. I think it took me about 20 minutes to get the bottom plate and arms assembled and be ready to starting on installing the motors and the electronics.

Before I started installing any of the electronics, I needed to tin all of the pads, and I figured that would be easier to do before I put them on the frame. In all of the build videos I’d watched to get ready for this, the builder would just put the board on the frame and then add the solder from there, but I was coming into this with just a little bit of soldering experience and I wanted to give myself the best chance at success. So I laid out all of the boards in the flight stack and made sure I knew which wires ran to which pad.

Then I tinned all of the boards at once: flight controller, four-in-one ESC, and VTX. The Caddx HD capture board on the camera had plugs and didn’t need any soldering.

Putting the ESC onto the frame as the base of the flight stack and installing the motors marked the first real part of the build for me as the quadcopter started to take shape. The process itself was pretty simple: screw a motor onto an arm, run the motor wires to the ESC, measure and cut the wires, solder them to the ESC. But cutting wires like that was a bit nerve wracking for me, as I was paranoid about cutting the wires too short and too long. On the one side I’d end up without enough slack and have to solder additional wire back on along with heat shrinking the joint, and on the other side I was trying to have a clean build plus extra wire would also contribute to extra weight. Which a few grams doesn’t sound like a lot but for a small 3″ build like this every gram counts.

After that the next step was the battery lead. As often seems to happen to me with this hobby, the part I was thinking was going to be easy turned out to be pretty difficult. It took a lot of work for me to get these two leads soldered onto the main battery pads of the ESC board. The heavy gauge wire and the big soldering pads on the board required a lot more heat than I’d been using up until now in order to get the joints flowed together properly.

Soldering the rest of the electronics was pretty easy. The hard part had been getting the documentation online for the various parts and making sure I knew which pads to use on the flight controller for the camera and the VTX. It had a pin header that plugged straight into the ESC board which made assembling the rest of the flight stack pretty easy.

Then came the big moment, plugging in the battery for the first time to see if it all worked. After going over all of the solder joints with a multimeter to see if I had shorted anything, I took the battery and plugged into a smoke stopper before plugging that into the battery lead on my new quadcopter. A smoke stopper is basically a fuse that will trip in the case when there’s a short somewhere so that you don’t release the magic smoke from the electronics. I’d bought one with a light and a reusable fuse at the same time that I ordered my parts.

The smoke stopper lit up green and the leds on the flight controller, receiver, and VTX are lit up as well. The best part though was hearing the startup tones playing as the flight controller and motors synced up.

After the battery test I connected it to my computer and went into Betaflight to check that all of the motors were spinning the right direction, and then change the settings on the two that weren’t. Then I plugged in a battery again and I checked that my radio would connect, and that I was getting a video signal in my goggles from the VTX.

At this point I figured I was just about done, I just needed to put the top plate on and the props. Which naturally is when I ran into the one problem that gave me the most trouble in the whole build.

When I picked out all of the parts, I remember adding up all of the heights to make sure that it would fit inside the frame. But I was looking at the height of the standoffs on the frame and not the length of the screws for the flight stack which were a couple of millimeters shorter. That makes sense to me now since you don’t want those touching the top plate and transferring impacts from the top plate into the flight stack, but it meant that I was just a couple of millimeters short on getting the top plate on my brand new build.

It took more time rearranging the parts and trying difference spacers between the boards to get everything to fit than it did to do the whole rest of the build, or at least that’s what it felt like to me, but in the end I did manage to squeeze everything in. I wasn’t completely happy with the solution but it would do until I could order slightly taller standoffs and longer stack screws.